# Welcome

## Welcome to the Hoyoung Directory

This doc is designed to be your go-to resource for all things Hoyoung. Use it to improve your gameplay, discover new strategies, and deepen your understanding of the class. Whether you're a beginner looking for guidance or a veteran refining your skills, you'll find everything you need here—from core mechanics to advanced optimizations.

<figure><img src="https://3215722581-files.gitbook.io/~/files/v0/b/gitbook-x-prod.appspot.com/o/spaces%2FW7sIVn1ZKxJj1fZIniSH%2Fuploads%2FEu92HUXy68zIKdxtc8Tg%2Fimage.png?alt=media&amp;token=54edaba2-152d-4de6-ba2c-1ff8794b5ccd" alt="" width="375"><figcaption></figcaption></figure>

### Jump right in

<table data-view="cards"><thead><tr><th></th><th data-type="content-ref"></th><th data-type="content-ref"></th><th data-hidden data-card-cover data-type="files"></th><th data-hidden></th><th data-hidden data-card-target data-type="content-ref"></th></tr></thead><tbody><tr><td><strong>Getting started</strong></td><td><a href="/introduction/overview">Class Overview</a></td><td></td><td><a href="https://3215722581-files.gitbook.io/~/files/v0/b/gitbook-x-prod.appspot.com/o/spaces%2FW7sIVn1ZKxJj1fZIniSH%2Fuploads%2FbmG5lL17WiTjFtQTZu7r%2F16400.img.skill.164001000.effect0.4.png?alt=media&amp;token=26f257b3-c40e-46fc-ad0a-45e62e376de9">16400.img.skill.164001000.effect0.4.png</a></td><td></td><td></td></tr><tr><td><strong>Basics</strong></td><td><a href="/basics/link-skills">Link Skills</a></td><td><a href="/basics/inner-ability">Inner Ability</a></td><td><a href="https://3215722581-files.gitbook.io/~/files/v0/b/gitbook-x-prod.appspot.com/o/spaces%2FW7sIVn1ZKxJj1fZIniSH%2Fuploads%2FV0i7vgWNW7LFXvCsaf2P%2FMaster_and_Hoyoung.png?alt=media&amp;token=1a4b7939-086e-49ea-8600-2002c803854c">Master_and_Hoyoung.png</a></td><td></td><td></td></tr><tr><td><strong>V &#x26; HEXA Matrix</strong></td><td><a href="/basics/v-matrix">V Matrix</a></td><td><a href="/basics/hexa-matrix">HEXA Matrix</a></td><td><a href="https://3215722581-files.gitbook.io/~/files/v0/b/gitbook-x-prod.appspot.com/o/spaces%2FW7sIVn1ZKxJj1fZIniSH%2Fuploads%2FYbigKz8sBtbOeieO8Fgm%2F3840x2160-v246-new-age-6th-job-update-maplestory.jpg?alt=media&amp;token=b0a3c3c8-f55b-4949-8b92-78d6114b4339">3840x2160-v246-new-age-6th-job-update-maplestory.jpg</a></td><td></td><td></td></tr><tr><td>Culvert</td><td><a href="/knowledge-base/culvert/rotation">Rotation</a></td><td><a href="/basics/link-skills/optimizing-link-skills-for-culvert">Optimizing Link Skills for Culvert</a></td><td><a href="https://3215722581-files.gitbook.io/~/files/v0/b/gitbook-x-prod.appspot.com/o/spaces%2FW7sIVn1ZKxJj1fZIniSH%2Fuploads%2FjxjXJa29Yg4Fv5G6cItY%2FMS_Monster_Arcanus_(5).png?alt=media&amp;token=ef077dae-4031-4d85-84af-4c4b7df6ce72">MS_Monster_Arcanus_(5).png</a></td><td></td><td></td></tr></tbody></table>


# Class Overview

Hoyoung is a very strong 3-minute thief burst class with a distinct kit unlike any other. Its most notable features include precise movement with the Nimbus Cloud flying skill, various mobility tools like door-teleport, a flexible iframe, and a self-door skill. These tools allow Hoyoung to handle boss interactions that would otherwise be significantly harder—or even unanswerable—for other classes.

| Race  | Branch | Main Stat |
| ----- | ------ | --------- |
| Anima | Thief  | LUK       |

## Why should I play Hoyoung?

Hoyoung boasts amazing aesthetics and a complete kit for both mobbing and bossing. While most classes can only lazy farm post-Janus/Erda Fountain, Hoyoung can start lazy farming much earlier and still enjoy great coverage thanks to its 2 - 3 extra summons that don’t require fragments to unlock.

In bossing, Hoyoung’s near-complete kit offers solid answers to many boss mechanics that other classes struggle with. Key highlights include:

* **Nimbus Cloud**: Precise 360-degree movement that can air stall, making it great for dodging and repositioning.
* **Gate Teleport**: Opens creative mobbing rotations and provides hazardous escapes.
* **Pseudo Teleport**: A short-cooldown TP-like movement skill.
* **Flexible iframe**: A variable-cooldown iframe that’s exceptionally versatile.
* **Movement tools**: Flash jump, up jump, and flash jump/cloud reset mechanics for high mobility.
* **Burst Damage**: Top-tier burst that thrives in both solo and party settings.
* **Darksight**: On demand albeit for 1-2 seconds, serviceable for some hazards.

{% hint style="success" %}
Whether you value aesthetics, mobbing performance, or bossing prowess, Hoyoung is an outlier in that it excels in all three. Most classes typically shine in just one or two areas, but Hoyoung truly has it all.
{% endhint %}

<figure><img src="https://3215722581-files.gitbook.io/~/files/v0/b/gitbook-x-prod.appspot.com/o/spaces%2FW7sIVn1ZKxJj1fZIniSH%2Fuploads%2FfMAXwjchtVXLZ9FECHMR%2F16411.img.skill.164111004.effect0.0.png?alt=media&amp;token=7a9dd824-028a-4907-9c9f-350b6e28fe25" alt=""><figcaption></figcaption></figure>


# Class Drawbacks

Hoyoung does have a few “cons” that players may want to consider, although some have been overstated historically.

<figure><img src="https://3215722581-files.gitbook.io/~/files/v0/b/gitbook-x-prod.appspot.com/o/spaces%2FW7sIVn1ZKxJj1fZIniSH%2Fuploads%2FX5kI8OMl0iLGUTDrm6TN%2Fimage.png?alt=media&amp;token=babf472a-bd39-4fee-b1e8-174d7aa33e96" alt="" width="375"><figcaption></figcaption></figure>

## ~~Burst Setup~~

Hoyoung’s most infamous drawback was the effort and time required to set-up our burst. The ~~sheer number of skills to press and the interaction with the gauge for~~ summons can feel overwhelming.&#x20;

<kbd><mark style="color:green;">Dec 2024 Updated!<mark style="color:green;"></kbd> Ride or Die (Milestone)

* Gauge Gating Removed: Summons can now be deployed without time or gauge restrictions.
* Air Usability: Major skills can now be used mid-air, making setups much smoother and faster.

<kbd><mark style="color:green;">June 2025 Updated!<mark style="color:green;"></kbd> Stargazer (NEXT)

* Skill Sequences: Simplifies our long burst into 2 sequences, decreasing burst setup by about 2-4 seconds.

## Damage Output

Prior to the patch, Hoyoung's damage output compared to thief cousins (Night Lord, Night Walker, and Xenon) was a common concern. While Hoyoung’s damage thrived under party bossing mechanics, it wasn’t exactly the king of either burst or DPM. Let’s be honest - there will always be outliers in this mushroom game every balance patch.

<kbd><mark style="color:green;">Dec 2024 Updated!<mark style="color:green;"></kbd> Post Ride or Die (Milestone)

* Hoyoung received an overall +10-11% Final Damage (FD) buff (Including +14% FD to 2 passive skills and Last Resort nerf), significantly closing the gap. We are eating really well and it closes the gap quite a bit.

## Spammable Attack Limitations

Hoyoung’s spammable attack, Earth: Ground Shattering Wave, has some noticeable downsides:

* Requires the character to stay grounded and animation locked.
* Very small vertical hitbox.
* It isn’t particularly fast.
* On-demand dash is a bit slow.

{% hint style="info" %}
These limitations can be worked around with experience and respecting boss attack patterns, but they can still feel clunky—especially when compared to faster spammable attacks or instant teleport skills (e.g., Seren pillars).
{% endhint %}

## Skill Boost Dependency

Hoyoung requires a lot of skills to be boosted in 5th job for optimal performance. This was most evident in earlier 5th job stages, where Hoyoung needed 6 slots for trios, on top of 4 V skills and other standard buffs. While this is no longer an issue for 5th job, the challenge resurfaces in 6th job.

* Luckily, our first mastery and origin skills are both incredibly strong.
* That said, Hoyoung’s damage is still spread across many skills, and the class has yet to hit its peak (clone mastery ![](https://lh7-rt.googleusercontent.com/docsz/AD_4nXd23h_fhZqkQqKfzfkSo9TMvi4BW7oc9ZhW3xdoVKLMy6tI-Ct2gF1KV__zrrzSc5qR7cpL7UiDlT6DAvf8yzNsBMHum-hVcZpcbAzaJknTOy_0_crbzePB-chGW6gnzmY-qnOxYA?key=KUCm3akYTmAh-b8XPdRnjgXr)).


# FAQ

<details>

<summary>Is HY Storyline Mandatory? <img src="https://cdn.discordapp.com/emojis/814650735052062830.webp?size=44&#x26;animated=true" alt=":taotielost:"></summary>

## Yes.

#### 💡 Lv. 10 - **The Missing Trainee 3**

* Nimbus Cloud (Flying)

**Note:** Lock Nimbus Cloud to continue using up jump!

#### 💡 Lv. 200 - **Sealing the Fiends: The Final Act 2**

* Exclusive Spell (Echo)
* Fiend Seal (ATT +10%, Final Damage +10%)

</details>

<details>

<summary>Is HY a Combo Class? <img src="https://cdn.discordapp.com/emojis/808889330071765022.webp?size=44&#x26;animated=true" alt=":wavespam1:"><img src="https://cdn.discordapp.com/emojis/808889349269225472.webp?size=44&#x26;animated=true" alt=":wavespam2:"><img src="https://cdn.discordapp.com/emojis/808889362950914048.webp?size=44&#x26;animated=true" alt=":wavespam3:"></summary>

### No. We don't Combo.

Different skills have different uses so play around with them to adapt to the situation

</details>

<details>

<summary>Does HY need Cooldown Reduction/Reset?</summary>

### We don't need CDR Hat or CD reset IA

We cut off 1-2sec of our AoE skills with CD hat but it wont change anything, cooldown skipping IA is unreliable and we have natural resets from our V skill.

*However* CDR Hat can be used for training if Consuming Flames is required in every rotation.

The loss of main stat to all our burst skills to increase the damage to Cudgel ![:cudgel\~1:](https://cdn.discordapp.com/emojis/1275673673038303285.webp?size=44) is not worth it.

</details>

<details>

<summary>Attack Speed Modifiers?</summary>

In addition to our ![:booster:](https://cdn.discordapp.com/emojis/1277646905115017266.webp?size=44) Booster, Hoyoung only requires both

**1.** ![:DSI\~1:](https://cdn.discordapp.com/emojis/1235963923694485605.webp?size=44) **Decent Speed Infusion** AND

**2.** ![:greenpot:](https://cdn.discordapp.com/emojis/1299915891508510782.webp?size=44) **Green Pot** to hit AS0

### We do not need AS+1 IA

### KMS vs GMS

GMS gains 6-7% FD from AS0 on a dummy compared to KMS\
Will be less in practice due to movement in boss fights

</details>


# Link Skills

## 1. Utility

<sub>Situational</sub>\
![:phantominstinct:](https://cdn.discordapp.com/emojis/1232970207837028373.webp?size=44) **Phantom** (Phantom Instinct) - Crit Rate +20% \
　↳ Use in combination with Lynn Link, Legion, Artifact and Hyperstats to **obtain 100% Crit Rate**

## 2. Survivability

<sub>Optional: Recommended if progging or unfamiliar with boss</sub>\
![:spiritoffreedom:](https://cdn.discordapp.com/emojis/1232970211448061982.webp?size=44) **Resistance x 4** (Spirit of Freedom) - Invincibility on Revival \
![:invinciblebelief:](https://cdn.discordapp.com/emojis/1232968855333240853.webp?size=44) **Explorer Warrior x 3** (Invincible Belief) - Recover HP \
　↳ Recover 35% HP every second for 3s, 210s cooldown \
![:innategift:](https://cdn.discordapp.com/emojis/1232968890221592606.webp?size=44) **Khali** (Innate Gift) - Recover HP \
　↳ Recover 2% HP every second for 5s, 30s cooldown \ <sub>Very little benefit</sub>\
![:closecall:](https://cdn.discordapp.com/emojis/1232968844557946950.webp?size=44) **Shade** (Close Call) - 10% to survive fatal attack

## 3. Damage

<sub>Fill in</sub> <sub></sub><sub>**from top to bottom**</sub> <sub></sub><sub>after choosing</sub> <sub></sub><sub>**1.**</sub> <sub></sub><sub>and</sub> <sub></sub><sub>**2.**</sub>\
![:AB:](https://cdn.discordapp.com/emojis/1272315080234631230.webp?size=96) **Angelic Buster** (Terms & Conditions) - Damage +60% for 10s \
![:furyunleashed:](https://cdn.discordapp.com/emojis/1232968851260440577.webp?size=44) **Demon Slayer** (Fury Unleashed) - Boss +20% \
![:moxuan:](https://cdn.discordapp.com/emojis/1375121454198423562.webp?size=44) **MoXuan** (Qi Cultivation) - Boss Damage +16% \
![:solus:](https://cdn.discordapp.com/emojis/1232970210101825569.webp?size=44) **Ark** (Solus) - Damage +16% \
![:wildrage:](https://cdn.discordapp.com/emojis/1232969789010481193.webp?size=44) **Demon Avenger** (Wild Rage) - Damage +15% \
![:lightwash:](https://cdn.discordapp.com/emojis/1232970205618241596.webp?size=44) **Luminous** (Light Wash) - **SEE NOTES BELOW** \
![:Adele:](https://cdn.discordapp.com/emojis/1174975861561233498.webp?size=44) **Adele** (Noble Fire) - **SEE NOTES BELOW** \
![:unfairadvantage:](https://cdn.discordapp.com/emojis/1232969703920631808.webp?size=44) **Cadena** (Unfair Advantage) - **SEE NOTES BELOW** \
![:judgement:](https://cdn.discordapp.com/emojis/1232971883318743080.webp?size=44) **Kinesis** (Judgement) - Crit Damage +4%\
﻿![:sia:](https://cdn.discordapp.com/emojis/1382186275628646460.webp?size=44)﻿ **Sia** (Tree of Stars) - Crit Damage + 3%, Buff Duration +10%\
![:focusspirit:](https://cdn.discordapp.com/emojis/1232968850384097280.webp?size=44) **Lynn** (Focus Spirit) - Boss +10%, Crit Rate +10% \
![:empiricalknowledge:](https://cdn.discordapp.com/emojis/1232968849381527582.webp?size=44) **!** **Explorer Mage x 3** (Empirical Knowledge) - Damage +9%, IED +9% \
![:thiefscunning:](https://cdn.discordapp.com/emojis/1232970213893607455.webp?size=44) **!** **Explorer Thief x 3** (Thief's Cunning) - Damage +9% (average) \
![:timetoprepare:](https://cdn.discordapp.com/emojis/1232971052670259280.webp?size=44) **Kain** (Time to Prepare) - Damage +8.5% (average) \
![:elementalism:](https://cdn.discordapp.com/emojis/1232968847305478194.webp?size=44) **Kanna** (Elementalism) - Damage +10% \
﻿![:tideofbattle:](https://cdn.discordapp.com/emojis/1232970858281173002.webp?size=44)﻿ **Illium** (Tide of Battle) - **SEE NOTES BELOW** \
![:hybridlogic:](https://cdn.discordapp.com/emojis/1232968852204163133.webp?size=44) **Xenon** (Hybrid Logic) - All Stats +10% \
![:GoddessBlessing:](https://cdn.discordapp.com/emojis/1042593874788491386.webp?size=96) **Cygnus x 5** (Cygnus Blessing) - Flat ATT \
![:piratesbanner:](https://cdn.discordapp.com/emojis/755859741535895725.webp?size=44) **Explorer Pirate x 3** (Pirate Blessing) - Flat Stat \
![:Hayato:](https://cdn.discordapp.com/emojis/1174975977101742142.webp?size=44) **Hayato** (Keen Edge) - Flat ATT & Stat

## Situational Damage Notes

![:lightwash:](https://cdn.discordapp.com/emojis/1232970205618241596.webp?size=44) **Luminous** (Light Wash) - IED +20% \
　↳ Use if below 97% Visual IED \
　↳ Check values in Maple Scouter if above 97% Visual IED \
![:Adele:](https://cdn.discordapp.com/emojis/1174975861561233498.webp?size=44) **Adele** (Noble Fire) - Boss Damage +12% **if in full party** \
![:unfairadvantage:](https://cdn.discordapp.com/emojis/1232969703920631808.webp?size=44) **Cadena** (Unfair Advantage) - Damage +12% \
　↳ 6% if higher level \
　↳ 6% if attacking debuffed enemy (Degeneration/Mage Link) \
﻿![:tideofbattle:](https://cdn.discordapp.com/emojis/1232970858281173002.webp?size=44)﻿ **Illium** (Tide of Battle) - Damage +12% \
　↳ 3% per stack, up to 4 stacks after moving a set distance \
　↳ **Pro**: Heaven: Iron-Fan Gale can proc and maintain the stacks \
　↳ **Pro**: If all 4 stacks are maintained, damage is higher than some other link options \
　↳ **Con**: Will not have damage bonus if you load into a fight, set up, press origin \
　↳ **Con**: If standing still off burst (e.g. in kaling), damage bonus will drop\ <sub>! Thief link</sub> <sub></sub><sub>**must**</sub> <sub></sub><sub>be used with Mage link. Mage link can be used by itself if needed.</sub>\
![:empiricalknowledge:](https://cdn.discordapp.com/emojis/1232968849381527582.webp?size=44) **Explorer Mage x 3** (Empirical Knowledge) \
![:thiefscunning:](https://cdn.discordapp.com/emojis/1232970213893607455.webp?size=44) **Explorer Thief x 3** (Thief's Cunning)

## Training

<sub>Essential</sub>\
![:elvenblessing:](https://cdn.discordapp.com/emojis/1232968848320233472.webp?size=44) **Mercedes** (Elven Blessing) - EXP% \
![:runepersistence:](https://cdn.discordapp.com/emojis/1232970209023889409.webp?size=44) **Evan** (Rune Persistence) - Rune Duration \
![:combokill:](https://cdn.discordapp.com/emojis/1232968846156103701.webp?size=44) **Aran** (Combo Kill Blessing) - Combo Orb +EXP% \
![:naturesfriend:](https://cdn.discordapp.com/emojis/1232970206838657057.webp?size=44) **Lara** (Nature's Friend) - Normal Monster Damage +16%


# Optimizing Link Skills for Culvert

### General Considerations

When optimizing link skills for Culvert, the primary focus should be on maximizing burst damage. Most players prioritize **Fatal timing, Cont4, and WJ4 Ring activation** over specific link skill timings. Any **damage-boosting link skill** is generally beneficial, with the exception of **Adele's link**, which is not effective in this context.

### Recommended Link Skill Adjustments for Culvert

#### Swapping Links

* ![](https://3215722581-files.gitbook.io/~/files/v0/b/gitbook-x-prod.appspot.com/o/spaces%2FW7sIVn1ZKxJj1fZIniSH%2Fuploads%2FNnUcHvzvBfkpXlCeV3nf%2Fimage.png?alt=media\&token=4bac920f-4c34-4cb1-8fa6-7da63d6393e0) **Resistance Link** is commonly replaced with ![](https://3215722581-files.gitbook.io/~/files/v0/b/gitbook-x-prod.appspot.com/o/spaces%2FW7sIVn1ZKxJj1fZIniSH%2Fuploads%2FPDKR4l9J5m6gZlchkXaS%2Fimage.png?alt=media\&token=73fbd459-63e8-4a1d-87e5-c7ec62065a24) **Kanna’s Link** when running Culvert.
* Some players also swap ![](https://3215722581-files.gitbook.io/~/files/v0/b/gitbook-x-prod.appspot.com/o/spaces%2FW7sIVn1ZKxJj1fZIniSH%2Fuploads%2F8bzpnLLnBD5LVVNVyzvh%2Fimage.png?alt=media\&token=c910b9a0-d067-49fa-bf02-bdf53136cbb3) **Xenon’s Link** for ![](https://3215722581-files.gitbook.io/~/files/v0/b/gitbook-x-prod.appspot.com/o/spaces%2FW7sIVn1ZKxJj1fZIniSH%2Fuploads%2FCUciSIk6eNqfstKpEFNI%2Fimage.png?alt=media\&token=9c59051e-9df7-48dd-9eea-fa68227d11f0) **Kain’s Link**, depending on personal preference and activation reliability.

#### Comparing Kanna, Xenon, and Kain Links

* ![](https://3215722581-files.gitbook.io/~/files/v0/b/gitbook-x-prod.appspot.com/o/spaces%2FW7sIVn1ZKxJj1fZIniSH%2Fuploads%2FylaNN2zXBXJSKQ1uiAZB%2Fimage.png?alt=media\&token=30bcc52e-a9db-43a0-8347-4e1279c25548) **Kanna’s Link:** +10% Damage (Consistent)
* ![](https://3215722581-files.gitbook.io/~/files/v0/b/gitbook-x-prod.appspot.com/o/spaces%2FW7sIVn1ZKxJj1fZIniSH%2Fuploads%2FIii757uBOb7PSyHydUG4%2Fimage.png?alt=media\&token=fccd2b77-978a-4bb6-bf2b-afb4133b8529) **Xenon’s Link:** +10% All Stats (Stable but not as impactful for pure damage)
* ![](https://3215722581-files.gitbook.io/~/files/v0/b/gitbook-x-prod.appspot.com/o/spaces%2FW7sIVn1ZKxJj1fZIniSH%2Fuploads%2FNSPY0zr5qWb67zlPupbL%2Fimage.png?alt=media\&token=b6abbca9-c348-4a28-8fc9-8f8df71b20c7) **Kain’s Link:** +17% Conditional Damage (Potentially strongest if active during burst)
  * Kain’s link is generally **superior for bossing and Culvert**, as long as its **conditional effect is active during burst**.
  * The difference between these options is minor, but Kain’s link is often preferred due to its higher damage potential during burst windows.

{% hint style="info" %}
Kanna’s Link provides consistent damage, while Kain’s Link offers higher conditional damage that may be active during bursts.
{% endhint %}

### ![](https://3215722581-files.gitbook.io/~/files/v0/b/gitbook-x-prod.appspot.com/o/spaces%2FW7sIVn1ZKxJj1fZIniSH%2Fuploads%2F89tCF9Kbrhq2iOafC77l%2Fimage.png?alt=media\&token=99f859a8-97c5-43a9-88ec-c47a81c1c7f8) Considerations for Luminous Link

* Some players **do not use Luminous Link** in Culvert due to already high **IED from event buffs and gear**.
* If a player is running a **Gollux set**, they may not need Luminous Link because they already have sufficient **IED coverage**.
* Players with **Blackheart instead of a full Gollux set** may still find Luminous Link useful to maintain high IED.

{% hint style="info" %}
High IED setups may not need Luminous Link—adjust based on your current stats.
{% endhint %}


# Inner Ability

## Recommended

| BIS Damage                                                | Training                                                  |
| --------------------------------------------------------- | --------------------------------------------------------- |
| <mark style="color:green;">Passive Skills +1 Level</mark> | <mark style="color:green;">+20% Item Drop Rate</mark>     |
| <mark style="color:orange;">+8% Abnormal Damage</mark>    | <mark style="color:orange;">+15% Mesos Obtained</mark>    |
| <mark style="color:orange;">+10% Boss Damage</mark>       | <mark style="color:orange;">Abnormal/Normal Damage</mark> |

{% hint style="info" %}
Item Drop Rate and Mesos Obtained are interchangeable based on personal preference
{% endhint %}

## Alternatives

Acceptable settles with low honor

* Buff Duration
* Crit Rate

{% hint style="warning" %}
Hoyoung does not need Attack Speed +1
{% endhint %}

## Passive Skills +1 vs Boss Damage

**Dragon's Eye:** +1 attack, +1% final damage +1% crit rate, +1% crit damage, +1% IED, +1% avoid

**Enlightenment:** +1% damage, +5% fan damage, +5% earth spam damage, +2% heaven(iron fan) damage, +5% stone tremor damage, +10% gourd damage, +5% clone damage, +5% ghost damage

**Advanced Ritual Fan Mastery:** +1% mastery, +1 atk, +1% final damage

{% hint style="info" %}
TLDR: 20% Boss Damage is more or less the same as +1 passives. However, when we look at 3 lines as a whole, you can do passives/10 boss/8 abnormal, while the other option is 20% boss/8% abnormal/????.
{% endhint %}


# Rolling your Inner Ability

## **Ideal Approach**

1. Start with **Miracle Circulators**:
   1. Roll Boss Damage on either the 2nd or 3rd line.
2. Switch to **Honor EXP**:
   1. Roll for Abnormal Status Damage on the 2nd or 3rd line (whichever doesn’t already have Boss Damage) **AND**
   2. Roll Passive Skills +1 on the 1st line

{% hint style="info" %}
This method is efficient because Abnormal Status Damage has a smaller range variance, making it easier to maximize.
{% endhint %}

## **Alternative Method**

1. Use **Honor EXP** to Roll All 3 Lines:
   1. Roll until you obtain Passive Skills +1, Boss Damage, and Abnormal Status Damage across the three lines - locking each one you want to keep as you go.
2. Refine with **Chaos Circulators**:
   1. Use Chaos Circulators to push both secondary lines (Boss Damage and Abnormal Status Damage) to their maximum values.


# Hyper Skills

<table data-header-hidden data-full-width="false"><thead><tr><th width="100"></th><th></th></tr></thead><tbody><tr><td><img src="https://lh7-rt.googleusercontent.com/docsz/AD_4nXco1vNGLopZ88-S2CHWiImoA-079bZC3LRs8Hp0o1_hCaLo_0ty0-Tph4HQUPTqY1oSPRKRZ9v3xuVazHWykstNptVvAB20iKaSIdEFD4bfs5sbvirdppjoYm8OgTRWtGAZ1Moomg?key=KUCm3akYTmAh-b8XPdRnjgXr" alt=""></td><td><p><strong>Empowered Harmony</strong></p><p>Damage +10%</p></td></tr><tr><td><img src="https://lh7-rt.googleusercontent.com/docsz/AD_4nXdptnLkMeOcZyeJLNZneaLLSetPGWPl8KlpJ4JrQaGTkkyxbib5cP-EImDQ9OloohJoFnq2nLdGHGQODozXDDRcGNbXGkZ5m_bqjRIU9N4jp2zpCUkxtSDkhVECH2k8rM71N_pbNg?key=KUCm3akYTmAh-b8XPdRnjgXr" alt=""></td><td><p><strong>Boss Rush Harmony</strong></p><p>Boss Damage +15%</p></td></tr><tr><td><img src="https://lh7-rt.googleusercontent.com/docsz/AD_4nXcBwF46JnD40JhiropjnCqOi2-ncnRLyhM4hpIDfvfYeAMDH4Q7ippXWqDcvfHP92EINtY7PTQq6GOGuOBDHEIFPKvBhXpHV553PnuEXtQ83HDu1alp49FtUODNoFSEJw-DgoyBRg?key=KUCm3akYTmAh-b8XPdRnjgXr" alt=""></td><td><p><strong>Guard Breaking Clones</strong></p><p>IED +25%</p></td></tr><tr><td><img src="https://lh7-rt.googleusercontent.com/docsz/AD_4nXe-k2DkBk15X9z9jBakhgc5AmCf9uMJiEwlxuV-xBnhMBYlorXZg9VlYMlrc8Njc3m7ViDf3zsyt5QJfdpwmAEi0GfsJYw-pMw4b-do43H6FH5mzyPXtjbIRmLsKwEeuUfy1VoCNA?key=KUCm3akYTmAh-b8XPdRnjgXr" alt=""></td><td><p><strong>Hasty Ghost Flame</strong></p><p>Attack Interval -25%</p></td></tr><tr><td><img src="https://lh7-rt.googleusercontent.com/docsz/AD_4nXdKGRuBxPwiZDix-XMkfa8nbCZiRu-TYhztuftwKu7xqGZXz_De0psbNN5lZl9Ox67F5Y1BnuQ3snjqalqW3FxVPbbKrKRIUeD5u_Suprtciv0PR1CiluRYpWFwo1-b8aeKQCnzAw?key=KUCm3akYTmAh-b8XPdRnjgXr" alt=""></td><td><p><strong>Hasty Vortex</strong></p><p>Attack Interval -20%</p></td></tr></tbody></table>


# Weapon, Secondary & Emblem

## **att / boss / ied** <a href="#text38" id="text38"></a>

For endgame setups, **8/1/0** (Boss Damage line on ![](https://3215722581-files.gitbook.io/~/files/v0/b/gitbook-x-prod.appspot.com/o/spaces%2FW7sIVn1ZKxJj1fZIniSH%2Fuploads%2Fd65p1Xyr8XeewtrsmFUN%2Fimage.png?alt=media\&token=06f8366c-9ec6-4121-911a-be767102018a) Secondary) is the strongest configuration, assuming double prime lines. The Boss Damage line on your Secondary is preferred because the ![](https://3215722581-files.gitbook.io/~/files/v0/b/gitbook-x-prod.appspot.com/o/spaces%2FW7sIVn1ZKxJj1fZIniSH%2Fuploads%2FaIOqBi1eNVdsWEkvBxao%2Fimage.png?alt=media\&token=028d4991-6fc0-4fc0-a656-66de4d2d6d3d)Weapon benefits from a higher potential tier for Attack % lines.

Whether your Secondary potential ends up being **12/12/30** or **12/40/9**, the difference is minimal — likely less than 0.2% Final Damage (FD). Feel free to go with whichever rolls first, as the difference is negligible.

When working on WSE for **9 usable lines**, both **7/2/0** and **9/0/0** setups are viable. The difference between them is only about 0.5 - 2% FD, so you can comfortably settle on whichever rolls first and revisit later when optimizing for damage per minute (DPM) or min-maxing your WSE setup.

If you’re using the ![](https://3215722581-files.gitbook.io/~/files/v0/b/gitbook-x-prod.appspot.com/o/spaces%2FW7sIVn1ZKxJj1fZIniSH%2Fuploads%2F6XLSH84EzMgUp5uO3l4n%2Fimage.png?alt=media\&token=2996e942-3f21-4cb9-abb2-c4a83151574a) Gold Three Paths Emblem (Lv. 100), **2/0/1** is a perfectly acceptable setup **until you can obtain** ![](https://3215722581-files.gitbook.io/~/files/v0/b/gitbook-x-prod.appspot.com/o/spaces%2FW7sIVn1ZKxJj1fZIniSH%2Fuploads%2FESZmowj4Ug7pkWdJEqVs%2Fimage.png?alt=media\&token=4ac50aaf-01d8-456f-bac8-1a93cddf3c55) **Mitra’s Rage**.

## **Progression Considerations** <a href="#text40" id="text40"></a>

From a progression standpoint, any of the above setups will serve you well for a long time—especially if your Weapon and Secondary have double prime lines. Generally, **you won’t aim for 36% attack** on the weapon until everything else in your gear is DP-optimized, or unless you’re feeling particularly lucky with rerolls.

For ![](https://3215722581-files.gitbook.io/~/files/v0/b/gitbook-x-prod.appspot.com/o/spaces%2FW7sIVn1ZKxJj1fZIniSH%2Fuploads%2FY5dkPD1IM7F7a982Xxe4%2Fimage.png?alt=media\&token=86bd2818-9c6b-4c0a-aff4-f843116ed56a) **Mitra’s Rage**, the Emblem should ideally be **3L Attack**. However, settling for an IED line is reasonable if you’re working on a tighter budget.


# Genesis Weapon Flames

### Understanding Attack Tiers

* When comparing T7 ATT and T6 ATT flames, **T7 ATT should not be used directly.**
* Instead, **T7 ATT should be translated to T6 ATT plus 12% Boss Damage.**
  * Example: If a flame has **T7 ATT (196)**, treat it as **T6 ATT (153) + 12% Boss Damage.**
  * This ensures fair comparisons between ATT and % bonuses.

### Comparing Stat Values

* All percentage-based stats are treated equally:
  * **1% All Stat = 1% Boss Damage = 1% Damage**
* LUK contributes to All Stat calculations:
  * **Every 10 LUK = 1% All Stat**

### How to Compare Flames

1. **Convert T7 ATT into T6 ATT + 12% Boss Damage.**
2. **Sum up all % bonuses** (All Stat, Boss Damage, Damage).
3. **Use LUK’s conversion rule** to factor it into the total.
4. **Compare total effective multipliers** to determine which flame is better.


# Legion Artifact

## Damage Priority

Boss Damage = Damage > Crit Damage = All Stat > ATT > Buff Duration

* Pair 1: Boss / Damage / Crit Damage
* Pair 2: All Stat / ATT / Buff Duration

{% hint style="info" %}
If you need IED, fit it in between Damage and Crit Damage
{% endhint %}

#### Training Options

* EXP / Meso / Item Drop
* Minion Summon Duration can extend Vortex and Ghost to almost match Erda Fountain / Janus

#### Other Considerations

* Cooldown Bypass - Extra damage
* Crit Rate - Repurpose Legion Grid/Hyper Stats
* Status Resistance - General survivability
* HP & MP - N/A for HY, applicable for other classes e.g. Kanna / DA
* Final Damage Skills - N/A for HY, applicable for other classes e.g. BM / Merc

<figure><img src="https://lh7-rt.googleusercontent.com/docsz/AD_4nXe5MLO-T28jXn9y3GVJk9F_oZky7lRqOb9_ck9TFHxdzkR_2K9wyUIi9tF1N4pGq_p1UGqXkz3Skb-vWD_fH8trWIXAJn2p6stL1ODIS3onZcxCUG6_vxbrlgNDD2-UFwMOk1Gj0w?key=KUCm3akYTmAh-b8XPdRnjgXr" alt=""><figcaption></figcaption></figure>


# V Matrix

## ![](https://3215722581-files.gitbook.io/~/files/v0/b/gitbook-x-prod.appspot.com/o/spaces%2FW7sIVn1ZKxJj1fZIniSH%2Fuploads%2FSwfokjFclTzAorkhwH2A%2Fimage.png?alt=media\&token=c62dbbc4-25d8-471e-9080-343c1cf4680c) **Boost Nodes** <a href="#text16" id="text16"></a>

### Option 1: Thematic Boost Build

{% hint style="success" %}
Streamlined for 🔥hyperburns and fast leveling, with skills grouped by type for 6th job convenience.
{% endhint %}

| <p>1st trio</p><p>basics</p>   | <p><img src="https://3215722581-files.gitbook.io/~/files/v0/b/gitbook-x-prod.appspot.com/o/spaces%2FW7sIVn1ZKxJj1fZIniSH%2Fuploads%2F9D4s5lfPrP0ImkD6p3bq%2Fimage.png?alt=media&amp;token=95e78231-cfc3-45e1-b1f7-da2a01913f56" alt="" data-size="original"><br>humanity</p> | <p><img src="https://3215722581-files.gitbook.io/~/files/v0/b/gitbook-x-prod.appspot.com/o/spaces%2FW7sIVn1ZKxJj1fZIniSH%2Fuploads%2FuWuVpmN6PrTmEyyyiPia%2Fimage.png?alt=media&amp;token=0fef37ee-0909-465e-8d01-d3c975112aed" alt="" data-size="original"><br>earth</p> |   <p><img src="https://3215722581-files.gitbook.io/~/files/v0/b/gitbook-x-prod.appspot.com/o/spaces%2FW7sIVn1ZKxJj1fZIniSH%2Fuploads%2F0mp0GeSGg4Xq9vALxQwI%2Fimage.png?alt=media&amp;token=763f83e8-3d55-419c-b501-626cac5bdb4f" alt="" data-size="original"><br>heaven</p>  |
| ------------------------------ | :--------------------------------------------------------------------------------------------------------------------------------------------------------------------------------------------------------------------------------------------------------------------------: | :-----------------------------------------------------------------------------------------------------------------------------------------------------------------------------------------------------------------------------------------------------------------------: | :---------------------------------------------------------------------------------------------------------------------------------------------------------------------------------------------------------------------------------------------------------------------------: |
| <p>2nd trio</p><p>talisman</p> |   <p><img src="https://3215722581-files.gitbook.io/~/files/v0/b/gitbook-x-prod.appspot.com/o/spaces%2FW7sIVn1ZKxJj1fZIniSH%2Fuploads%2FH7brxBr6enqKt2u2uO4l%2Fimage.png?alt=media&amp;token=d01a3b80-4c74-44db-946c-66d43ff36e18" alt="" data-size="original"><br>clone</p>  | <p><img src="https://3215722581-files.gitbook.io/~/files/v0/b/gitbook-x-prod.appspot.com/o/spaces%2FW7sIVn1ZKxJj1fZIniSH%2Fuploads%2FWEHI7WtmBuKn18zKGShu%2Fimage.png?alt=media&amp;token=e6a74420-0316-46eb-848e-f3cfcc7360f3" alt="" data-size="original"><br>ghost</p> |   <p><img src="https://3215722581-files.gitbook.io/~/files/v0/b/gitbook-x-prod.appspot.com/o/spaces%2FW7sIVn1ZKxJj1fZIniSH%2Fuploads%2Fad0MBqRviVKRlGzvdBln%2Fimage.png?alt=media&amp;token=8e0b65c3-fda8-45d0-8373-24004d6bb784" alt="" data-size="original"><br>gourd</p>   |
| <p>3rd trio</p><p>scroll</p>   |  <p><img src="https://3215722581-files.gitbook.io/~/files/v0/b/gitbook-x-prod.appspot.com/o/spaces%2FW7sIVn1ZKxJj1fZIniSH%2Fuploads%2FtqpA9x6ujOMLIrKvNZK3%2Fimage.png?alt=media&amp;token=3e04a59e-5f07-4ff8-96ba-f76ef64fb0ab" alt="" data-size="original"><br>vortex</p>  | <p><img src="https://3215722581-files.gitbook.io/~/files/v0/b/gitbook-x-prod.appspot.com/o/spaces%2FW7sIVn1ZKxJj1fZIniSH%2Fuploads%2FZibscVcsWpu8HS1LFMVd%2Fimage.png?alt=media&amp;token=6dad52e4-7f54-4a13-a319-c9a709c51c02" alt="" data-size="original"><br>degen</p> | <p><img src="https://3215722581-files.gitbook.io/~/files/v0/b/gitbook-x-prod.appspot.com/o/spaces%2FW7sIVn1ZKxJj1fZIniSH%2Fuploads%2FfXEgsoZkUMnQA5u7nojL%2Fimage.png?alt=media&amp;token=8262946e-af56-4c73-8ff8-6f0b6301ed41" alt="" data-size="original"><br>butterfly</p> |

### Option 2: **Standard Boost Build**

{% hint style="warning" %}
Optimized for **low-level bossing** and steady progression, focusing on damage efficiency.
{% endhint %}

| <p>1st trio<br>most important</p>  |  <p><img src="https://3215722581-files.gitbook.io/~/files/v0/b/gitbook-x-prod.appspot.com/o/spaces%2FW7sIVn1ZKxJj1fZIniSH%2Fuploads%2FiCXYxSuWwk2QZ02VTh2j%2Fimage.png?alt=media&amp;token=9dfd3a34-a67d-4406-95d5-f99446504712" alt="" data-size="original"><br>clone</p> | <p><img src="https://3215722581-files.gitbook.io/~/files/v0/b/gitbook-x-prod.appspot.com/o/spaces%2FW7sIVn1ZKxJj1fZIniSH%2Fuploads%2F52SQV49wnJgDFqmjtzKm%2Fimage.png?alt=media&amp;token=c56598b5-e09a-45d2-8627-7590f5772abf" alt="" data-size="original"><br>earth</p> |  <p><img src="https://3215722581-files.gitbook.io/~/files/v0/b/gitbook-x-prod.appspot.com/o/spaces%2FW7sIVn1ZKxJj1fZIniSH%2Fuploads%2FKqB7RnJe9MPjrknRbD0v%2Fimage.png?alt=media&amp;token=a5acc743-13ea-42d6-b010-f7788a10e747" alt="" data-size="original"><br>humanity</p> |
| ---------------------------------- | :------------------------------------------------------------------------------------------------------------------------------------------------------------------------------------------------------------------------------------------------------------------------: | :-----------------------------------------------------------------------------------------------------------------------------------------------------------------------------------------------------------------------------------------------------------------------: | :---------------------------------------------------------------------------------------------------------------------------------------------------------------------------------------------------------------------------------------------------------------------------: |
| <p>2nd trio<br>important</p>       | <p><img src="https://3215722581-files.gitbook.io/~/files/v0/b/gitbook-x-prod.appspot.com/o/spaces%2FW7sIVn1ZKxJj1fZIniSH%2Fuploads%2FBHXM3uaMpblISUzvj4ys%2Fimage.png?alt=media&amp;token=ced81a2c-2b00-496f-a38d-f3ae6bc81c33" alt="" data-size="original"><br>heaven</p> | <p><img src="https://3215722581-files.gitbook.io/~/files/v0/b/gitbook-x-prod.appspot.com/o/spaces%2FW7sIVn1ZKxJj1fZIniSH%2Fuploads%2FiJ6KdcTTEh7jyoJfjLJL%2Fimage.png?alt=media&amp;token=92c26b83-dfda-455b-9f9d-80dd581d3b13" alt="" data-size="original"><br>ghost</p> |   <p><img src="https://3215722581-files.gitbook.io/~/files/v0/b/gitbook-x-prod.appspot.com/o/spaces%2FW7sIVn1ZKxJj1fZIniSH%2Fuploads%2Fv9HdMw9uKkxV94D3vnrx%2Fimage.png?alt=media&amp;token=4eb64864-483a-4551-aa5d-7751f86c93ec" alt="" data-size="original"><br>vortex</p>  |
| <p>3rd trio<br>least important</p> |  <p><img src="https://3215722581-files.gitbook.io/~/files/v0/b/gitbook-x-prod.appspot.com/o/spaces%2FW7sIVn1ZKxJj1fZIniSH%2Fuploads%2FlrQa0h3sjadjON07d2nZ%2Fimage.png?alt=media&amp;token=904ede28-015e-4374-b0a6-d26931a5d900" alt="" data-size="original"><br>gourd</p> | <p><img src="https://3215722581-files.gitbook.io/~/files/v0/b/gitbook-x-prod.appspot.com/o/spaces%2FW7sIVn1ZKxJj1fZIniSH%2Fuploads%2FxiaT3FehjtvcMuwek5eK%2Fimage.png?alt=media&amp;token=067b7fb1-9ed1-4bfa-bc2b-04d0b9b3059b" alt="" data-size="original"><br>degen</p> | <p><img src="https://3215722581-files.gitbook.io/~/files/v0/b/gitbook-x-prod.appspot.com/o/spaces%2FW7sIVn1ZKxJj1fZIniSH%2Fuploads%2FaCrqSOK9Hi2WHFwPD1uL%2Fimage.png?alt=media&amp;token=b2e3dbff-7225-455a-8613-937696d0749b" alt="" data-size="original"><br>butterfly</p> |

## ![](https://3215722581-files.gitbook.io/~/files/v0/b/gitbook-x-prod.appspot.com/o/spaces%2FW7sIVn1ZKxJj1fZIniSH%2Fuploads%2Fc6xKmRWGVnghWKRXlvgF%2Fimage.png?alt=media\&token=3ce51ad5-2b83-46c3-ae93-338a6ddf130e)**Other Nodestones**

<details>

<summary>General</summary>

![](https://3215722581-files.gitbook.io/~/files/v0/b/gitbook-x-prod.appspot.com/o/spaces%2FW7sIVn1ZKxJj1fZIniSH%2Fuploads%2FI2seNwABjRSWQINV3s37%2Fimage.png?alt=media\&token=1b6e8c8f-ab57-472d-90bc-6213c3ec224b) Decent Holy Symbol (DHS) - *exp / drop rate* \
![](https://3215722581-files.gitbook.io/~/files/v0/b/gitbook-x-prod.appspot.com/o/spaces%2FW7sIVn1ZKxJj1fZIniSH%2Fuploads%2FZh77p5RLWiCKiXFhBSrG%2Fimage.png?alt=media\&token=ef0c9a9a-0d36-4dad-a2c5-07ac89efc080) Decent Speed Infusion (DSI) - *attack speed* \
![](https://3215722581-files.gitbook.io/~/files/v0/b/gitbook-x-prod.appspot.com/o/spaces%2FW7sIVn1ZKxJj1fZIniSH%2Fuploads%2FLr6dv8AC313tuWX0vF3v%2Fimage.png?alt=media\&token=dbe65004-9fa6-4867-99c6-33af9a4d5b60) Decent Sharp Eyes (DSE) - *crit damage / crit rate* \
![](https://3215722581-files.gitbook.io/~/files/v0/b/gitbook-x-prod.appspot.com/o/spaces%2FW7sIVn1ZKxJj1fZIniSH%2Fuploads%2FmicTV4mXACruOgEa94a3%2Fimage.png?alt=media\&token=8e60cf4c-cbb2-437c-b582-cf422c08c041) Decent Combat Orders (DCO) - *skills +1* Decent \
![](https://3215722581-files.gitbook.io/~/files/v0/b/gitbook-x-prod.appspot.com/o/spaces%2FW7sIVn1ZKxJj1fZIniSH%2Fuploads%2FjOFgiaiSddb8ZYboMPCC%2Fimage.png?alt=media\&token=c66000ac-2843-4625-9d1e-4e4c60f6e9f3) Advanced Blessing (DAB) - *general stats* \
![](https://3215722581-files.gitbook.io/~/files/v0/b/gitbook-x-prod.appspot.com/o/spaces%2FW7sIVn1ZKxJj1fZIniSH%2Fuploads%2F2IwEsXoS0iwik2RMo6PV%2Fimage.png?alt=media\&token=b2ce682e-d066-4766-b23f-93675eccfff3) Erda Shower - *farming*

</details>

<details>

<summary>Damage</summary>

![](https://3215722581-files.gitbook.io/~/files/v0/b/gitbook-x-prod.appspot.com/o/spaces%2FW7sIVn1ZKxJj1fZIniSH%2Fuploads%2FHh03m1GuBE7SLDbIAFfg%2Fimage.png?alt=media\&token=4b8aa7c1-416a-453e-9a96-249796d110e9) Grandis Goddess's Blessing \
![](https://3215722581-files.gitbook.io/~/files/v0/b/gitbook-x-prod.appspot.com/o/spaces%2FW7sIVn1ZKxJj1fZIniSH%2Fuploads%2F6biCe6D6dyT0NzEsRrSP%2Fimage.png?alt=media\&token=a284804e-0820-47a3-b75d-d2a33ed51366) Last Resort (LR) \
![](https://3215722581-files.gitbook.io/~/files/v0/b/gitbook-x-prod.appspot.com/o/spaces%2FW7sIVn1ZKxJj1fZIniSH%2Fuploads%2FE1bQa7JTkivlOFRiXPZH%2Fimage.png?alt=media\&token=b2ccbc51-1c94-423f-83bb-0dac3e4d7dd6) Arachnid Reflection - *obtained at Lv. 235* \
![](https://3215722581-files.gitbook.io/~/files/v0/b/gitbook-x-prod.appspot.com/o/spaces%2FW7sIVn1ZKxJj1fZIniSH%2Fuploads%2FadRCSbfblIYaRaHfj7bB%2Fimage.png?alt=media\&token=de4cb6b4-99d4-4350-baf7-6ae0734d43a0) Solar Crest - *obtained after defeating Hard Seren*

</details>

<details>

<summary>Bossing Utility</summary>

![](https://3215722581-files.gitbook.io/~/files/v0/b/gitbook-x-prod.appspot.com/o/spaces%2FW7sIVn1ZKxJj1fZIniSH%2Fuploads%2F8kWFYUnHi4EBeGWOw0HF%2Fimage.png?alt=media\&token=1b2fa929-7f6d-4ed3-9faf-cd993cf00ec5) Lotus Flower - extra door\
![](https://3215722581-files.gitbook.io/~/files/v0/b/gitbook-x-prod.appspot.com/o/spaces%2FW7sIVn1ZKxJj1fZIniSH%2Fuploads%2FU3wrCmNlOrMJN4NOFVXo%2Fimage.png?alt=media\&token=58ba5baf-7e52-4f3e-b425-9c6f8d2230e0) Decent Holy Fountain (DHF) \
![](https://3215722581-files.gitbook.io/~/files/v0/b/gitbook-x-prod.appspot.com/o/spaces%2FW7sIVn1ZKxJj1fZIniSH%2Fuploads%2FY0QvErEa2USJ6uVRFjI2%2Fimage.png?alt=media\&token=900cc092-648a-4e32-85ee-2eee6c1d0d26) Blink\
![](https://3215722581-files.gitbook.io/~/files/v0/b/gitbook-x-prod.appspot.com/o/spaces%2FW7sIVn1ZKxJj1fZIniSH%2Fuploads%2FAP9shdjzhw4zhDVAPCCg%2Fimage.png?alt=media\&token=f7b32a42-09b8-4d94-86d9-1cbf4bca64b8) Erda Nova - *mid air bind* \
![](https://3215722581-files.gitbook.io/~/files/v0/b/gitbook-x-prod.appspot.com/o/spaces%2FW7sIVn1ZKxJj1fZIniSH%2Fuploads%2F9u8v2N9W4Q2YnA6njQAo%2Fimage.png?alt=media\&token=c01bb582-3205-4d62-bf5d-704c2c836505) Will of Erda

</details>

<details>

<summary>Min-maxing</summary>

*Equip just for passive stats*\
![](https://3215722581-files.gitbook.io/~/files/v0/b/gitbook-x-prod.appspot.com/o/spaces%2FW7sIVn1ZKxJj1fZIniSH%2Fuploads%2FQIZS1STX1u3Iw4kdM7Nm%2Fimage.png?alt=media\&token=5a6a53c2-8925-44df-9022-36eef74eb3d9) Decent Hyper Body (DHB) \
![](https://3215722581-files.gitbook.io/~/files/v0/b/gitbook-x-prod.appspot.com/o/spaces%2FW7sIVn1ZKxJj1fZIniSH%2Fuploads%2Fv8lGF9NdVivjmpjULKZz%2Fimage.png?alt=media\&token=cccdbc40-c7a0-49f6-887f-c1bd4062c975) Rope Lift

</details>

## ![](https://3215722581-files.gitbook.io/~/files/v0/b/gitbook-x-prod.appspot.com/o/spaces%2FW7sIVn1ZKxJj1fZIniSH%2Fuploads%2FQpNWy1pz38UWkf4heOyT%2Fimage.png?alt=media\&token=0e4f918f-ae3c-4bbe-9489-015635e3ee0a)**Node Upgrade Order** <a href="#text25" id="text25"></a>

Boosts > Decent Holy Symbol > Clone Rampage > Wrath of Gods > Apparition >= Tiger > Last Resort > Grandis Blessing > Other Decents > Will of Erda > Other

{% hint style="info" %}
This order is just a general recommendation, feel free to upgrade based on personal preference and play style.
{% endhint %}


# HEXA Matrix

## **HEXA Matrix Infographic** <a href="#text08" id="text08"></a>

Updated for NEXT (added Mastery 3 & 4)

{% tabs %}
{% tab title="Heroic (Reboot)" %}
{% hint style="warning" %}
The heroic hexa priority displayed is a simplifed version, which gives similar FD with fewer steps. For full optimization and extra breakpoints, check MapleScouter or the Hoyoung HEXA Matrix Tracker sheet.
{% endhint %}

<figure><img src="https://3215722581-files.gitbook.io/~/files/v0/b/gitbook-x-prod.appspot.com/o/spaces%2FW7sIVn1ZKxJj1fZIniSH%2Fuploads%2FB20Oj1yzOaRqXDTR0u0e%2FHoyoung_HEXA_m3m4_Reboot.png?alt=media&amp;token=2f1d93c2-6bb9-43e0-920f-89376ad013c9" alt=""><figcaption></figcaption></figure>
{% endtab %}

{% tab title="Interactive (Reg)" %}

<figure><img src="https://3215722581-files.gitbook.io/~/files/v0/b/gitbook-x-prod.appspot.com/o/spaces%2FW7sIVn1ZKxJj1fZIniSH%2Fuploads%2FuRN54Eov2wPbFFTAebo9%2FHoyoung_HEXA_m3m4_Reboot.png?alt=media&amp;token=59d33dd8-ad13-4a7a-9704-d295e3ea6e72" alt=""><figcaption></figcaption></figure>
{% endtab %}
{% endtabs %}

## **HEXA Matrix Priority** <a href="#text08" id="text08"></a>

**Dynamic Google Sheet Tracker**\
Access sheet [**here**](https://bit.ly/HoyoungHexaPlanner)&#x20;

**Updated 26/02/2025**&#x20;

1. Updated for NEXT (added Mastery 3 & 4)
2. Quick Stats Panel calculations now exclude Sol Janus and Hexa Stat Frags
3. Added new Profile Tab

<figure><img src="https://i.imgur.com/NxAdzDZ.png" alt=""><figcaption></figcaption></figure>


# Sol Janus

Unlocking **Sol Janus** to level 1 should be a top priority due to the **significant time savings** in dailies and farming — unless your Hoyoung is just a boss mule that doesn’t do either (*shame on you*).

Depending on your **training map and progression, level 10, 20, or 30** are all valid options. Hoyoung can clear most maps easily with **one or two Dawn Orbs** (or with **Dusk Lightning**), but if your goal is level 290, then investing in Sol Janus earlier is beneficial.

Key factors to consider:

* Do you train enough to justify the investment?
* Do you value upfront damage more to clear certain bosses or secure a party slot?
* At some point, level advantage may provide more FD than gaining one or two levels in less impactful skills.

{% embed url="<https://hoyoung.crd.co/assets/videos/video01.mp4?v=ceae27dc>" %}


# HEXA Stat

## ![:hexastat1:](https://cdn.discordapp.com/emojis/1307699828419199027.webp?size=44) HEXA Stat I

{% hint style="success" %}
Available starting at **Lv. 260**
{% endhint %}

**Heroic (Reboot):** Unlock **after you upgrade** ![:rampage:](https://cdn.discordapp.com/emojis/1337965202359980033.webp?size=44) **Rampage 5** \
**Interactive (Reg):** Unlock **after you upgrade** ![:rampage:](https://cdn.discordapp.com/emojis/1337965202359980033.webp?size=44) **Rampage 4**

### **Initially**

1. MAIN STAT to ATT
2. ADDITIONAL STATS to Crit Damage and LUK
3. Keep Enhancing until MAIN STAT gets to level 3 (cost increase from 10 to 20)
4. Decide if you want to max it out now, or come back to it after upgrading other HEXA Skills

{% hint style="info" %}
Max now: Small damage increase to all skills\
Come back: Focus on specific skills (e.g. burst for boss prog)
{% endhint %}

### Optimal (when maxed)

Prioritise highest levels/stat for ATT > LUK > Crit Damage

{% hint style="info" %}
ATT is affected by % lines, LUK is a flat bonus (final stat)
{% endhint %}

## ![:hexastat2:](https://cdn.discordapp.com/emojis/1307699830600237229.webp?size=44) HEXA Stat II

{% hint style="warning" %}
Available starting at **Lv. 265**
{% endhint %}

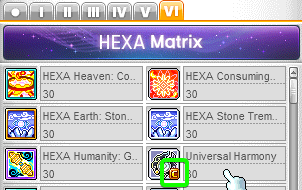
**Heroic & Interactive:** Unlock **after** ![:m1s:](https://cdn.discordapp.com/emojis/1388660606500081715.webp?size=44) **Universal Harmony** (Mastery I) **reaches Lv. 18**\
Use [MapleScouter](https://maplescouter.com/optimizer) to check what is best for you personally.<br>

## ![:hexastat3:](https://cdn.discordapp.com/emojis/1395017239723245639.webp?size=44) HEXA Stat III

{% hint style="warning" %}
Available starting at **Lv. 270**
{% endhint %}

**Heroic:** Unlock **after you upgrade** ![:apo:](https://cdn.discordapp.com/emojis/1390166732060102758.webp?size=44) **Apotheosis 5** \
**Interactive:** Unlock **after you upgrade** ![:Tiger:](https://cdn.discordapp.com/emojis/1395020831297507428.webp?size=44) **Tiger 1**\
Use [MapleScouter](https://maplescouter.com/optimizer) to check what is best for you personally.


# Common Questions

## ![:Apo:](https://cdn.discordapp.com/emojis/1275672899180695553.webp?size=44) Origin

For maximum damage, **hold down** origin until you see the **full screen mountains** appear

<figure><img src="https://3215722581-files.gitbook.io/~/files/v0/b/gitbook-x-prod.appspot.com/o/spaces%2FW7sIVn1ZKxJj1fZIniSH%2Fuploads%2FmxgQQ7V5oILtZ895tGvQ%2F16414.img.skill.164141501.screen.4.png?alt=media&amp;token=6de0b523-3ddd-4775-a3c4-5fc27a4bc23e" alt=""><figcaption></figcaption></figure>

## ![:harmony:](https://cdn.discordapp.com/emojis/1275675098774503511.webp?size=44) Locking Universal Harmony

Universal Harmony affects both our basic skills (Earth Shattering Wave) as well as our CD skills (Cudgel). **Lock** Universal Harmony by **right clicking** the skill so only our big CD skills will be empowered.

<figure><img src="https://images-ext-1.discordapp.net/external/6A4IBUyyVyRmFFEGftO5fwdhPalOJWJjrUeD6mF0VTk/https/i.imgur.com/b9NuZXB.png?format=webp&#x26;quality=lossless" alt=""><figcaption></figcaption></figure>


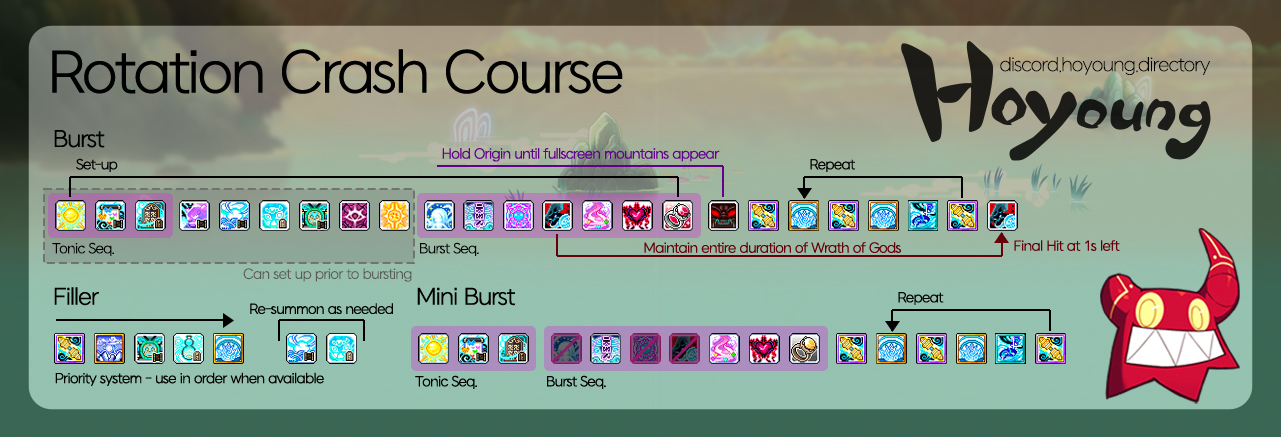
# Sequences

## Recommended Skills to Sequence

**Tonic Sequence**

> ![](https://3215722581-files.gitbook.io/~/files/v0/b/gitbook-x-prod.appspot.com/o/spaces%2FW7sIVn1ZKxJj1fZIniSH%2Fuploads%2FBOdJKrdjNFRULTpVAHFO%2Fimage.png?alt=media\&token=a5a780b8-773a-4b0d-8c93-df361cf2e44f) ![](https://3215722581-files.gitbook.io/~/files/v0/b/gitbook-x-prod.appspot.com/o/spaces%2FW7sIVn1ZKxJj1fZIniSH%2Fuploads%2Fs47JOqMLZcfuEkwmg8kr%2Fimage.png?alt=media\&token=2f85cd08-483d-4d23-bf50-513a4e57edbf) ![](https://3215722581-files.gitbook.io/~/files/v0/b/gitbook-x-prod.appspot.com/o/spaces%2FW7sIVn1ZKxJj1fZIniSH%2Fuploads%2FXguAHltzjMkqJ5hSOUfY%2Fimage.png?alt=media\&token=240d216e-734b-4c23-8d46-661f53f8587d)

{% hint style="warning" %}

## Tonic Sequence Latency

If your **Butterfly** or **Clone** does not go off after tonic due to latency, try the following:
{% endhint %}

> Use the original **Tonic Sequence** twice in a row **OR** \
> ﻿![:tonic\~1:](https://cdn.discordapp.com/emojis/906835868415852554.webp?size=44)﻿ ![:booster:](https://cdn.discordapp.com/emojis/1277646905115017266.webp?size=44) ![:butterfly\~1:](https://cdn.discordapp.com/emojis/1337964780886953994.webp?size=44)﻿ ![:clone:](https://cdn.discordapp.com/emojis/1337964848860106823.webp?size=44)﻿ **OR** ﻿\
> ![:tonic\~1:](https://cdn.discordapp.com/emojis/906835868415852554.webp?size=44)﻿ ![:booster:](https://cdn.discordapp.com/emojis/1277646905115017266.webp?size=44) ![:echo:](https://cdn.discordapp.com/emojis/1382667655240093726.webp?size=44) ![:butterfly\~1:](https://cdn.discordapp.com/emojis/1337964780886953994.webp?size=44)﻿ ![:clone:](https://cdn.discordapp.com/emojis/1337964848860106823.webp?size=44)

**Burst Sequence**

> ![](https://3215722581-files.gitbook.io/~/files/v0/b/gitbook-x-prod.appspot.com/o/spaces%2FW7sIVn1ZKxJj1fZIniSH%2Fuploads%2FDQHv0sB0UsZj5fCn3CEg%2Fimage.png?alt=media\&token=7bcf006b-6818-474b-a891-dfb832e4bbbe) ![](https://3215722581-files.gitbook.io/~/files/v0/b/gitbook-x-prod.appspot.com/o/spaces%2FW7sIVn1ZKxJj1fZIniSH%2Fuploads%2FRUYSjrztCel99KZf2r0r%2Fimage.png?alt=media\&token=64ca5b2d-2378-4e3a-980d-e900eb61a38b) ![](https://3215722581-files.gitbook.io/~/files/v0/b/gitbook-x-prod.appspot.com/o/spaces%2FW7sIVn1ZKxJj1fZIniSH%2Fuploads%2F7PJ6VRdOjmPfjJ5zgLqT%2Fimage.png?alt=media\&token=8d7f076b-3edf-4589-a8d8-648347e0e917) ![](https://3215722581-files.gitbook.io/~/files/v0/b/gitbook-x-prod.appspot.com/o/spaces%2FW7sIVn1ZKxJj1fZIniSH%2Fuploads%2FwURs11tMyHJGgTI4QJPo%2Fimage.png?alt=media\&token=80f64990-5c7e-4dc7-9733-c0cd3adbb2ab) ![](https://3215722581-files.gitbook.io/~/files/v0/b/gitbook-x-prod.appspot.com/o/spaces%2FW7sIVn1ZKxJj1fZIniSH%2Fuploads%2FrV0w0h5cecx4Huo251lV%2Fimage.png?alt=media\&token=01f1fbbd-7e3a-4075-bee4-2fd95505cb64) ![](https://3215722581-files.gitbook.io/~/files/v0/b/gitbook-x-prod.appspot.com/o/spaces%2FW7sIVn1ZKxJj1fZIniSH%2Fuploads%2Fngh6r1hPZuCx1der3SAR%2Fimage.png?alt=media\&token=f8a458f3-882a-4027-be21-be9cbdc7fa86) ![](https://3215722581-files.gitbook.io/~/files/v0/b/gitbook-x-prod.appspot.com/o/spaces%2FW7sIVn1ZKxJj1fZIniSH%2Fuploads%2FTrDgfPK2m8AcBB8tXzj4%2Fimage.png?alt=media\&token=ad3e1eb3-5bb5-4ed5-87ce-24827e5e3a68)

### Important Notes

1. You will need to keep your ![:Wrath:](https://cdn.discordapp.com/emojis/1275672902922145946.webp?size=44) WoG keybind to activate the final hit at the end - **you cannot use the sequence to activate the final hit**.


# Training

### Join Our Community for Expert Guidance

For an extensive collection of training guides, map recommendations, and community discussions, we encourage you to join our Discord server.

{% hint style="info" %}
Our Discord features a comprehensive list of training maps, efficiency breakdowns, and real-time advice from experienced players.
{% endhint %}

#### **Join Our Discord!**

<img src="https://3215722581-files.gitbook.io/~/files/v0/b/gitbook-x-prod.appspot.com/o/spaces%2FW7sIVn1ZKxJj1fZIniSH%2Fuploads%2FrVYNVPX7lNP9FtcBtQar%2Fimage.png?alt=media&amp;token=2fac3a15-f060-43db-8ef0-806eae7c68b1" alt="" data-size="line">  <https://discord.hoyoung.directory/>

Inside the server, you’ll find:

* **Training map recommendations** for all levels.
* **Optimal mobbing rotations** based on efficiency.
* **Community discussions and tips** for maximizing experience gain.

Join today and take your training to the next level!


# Skills

### 1st Job \~ Hyper ![](https://media.maplestorywiki.net/yetidb/Skill_0th_Job.png) ![](https://media.maplestorywiki.net/yetidb/Skill_1st_Job.png) ![](https://media.maplestorywiki.net/yetidb/Skill_2nd_Job.png) ![](https://media.maplestorywiki.net/yetidb/Skill_3rd_Job.png) ![](https://media.maplestorywiki.net/yetidb/Skill_4th_Job.png) ![](https://media.maplestorywiki.net/yetidb/Skill_Hyper.png)

{% tabs %}
{% tab title="Attacks" %}
{% hint style="success" %}
All Basics and Enhanced Skills Increase Gauge
{% endhint %}

## Basics - Spamable

<table><thead><tr><th valign="top">Skill</th><th>Notes</th></tr></thead><tbody><tr><td valign="top"><img src="https://media.maplestorywiki.net/yetidb/Skill_1st_Job.png" alt="" data-size="line"> <img src="https://3215722581-files.gitbook.io/~/files/v0/b/gitbook-x-prod.appspot.com/o/spaces%2FW7sIVn1ZKxJj1fZIniSH%2Fuploads%2FyNylN5rnUIKT1PoBVOqv%2Fimage.png?alt=media&amp;token=0ca4bada-745a-4dce-b180-33de3c5cc1d6" alt=""> <strong>Humanity: As-You-Will Fan</strong></td><td></td></tr><tr><td valign="top"><img src="https://media.maplestorywiki.net/yetidb/Skill_2nd_Job.png" alt="" data-size="line"> <img src="https://3215722581-files.gitbook.io/~/files/v0/b/gitbook-x-prod.appspot.com/o/spaces%2FW7sIVn1ZKxJj1fZIniSH%2Fuploads%2FuW0ttaQa5ZmtCKKXWesv%2Fimage.png?alt=media&amp;token=246b8a5f-3446-4da8-a5ef-a72e0a19e003" alt=""> <strong>Earth: Ground-Shattering Wave</strong></td><td>Movement - Dash<br>Triggers Out of Sight (Dark sight)</td></tr><tr><td valign="top"><img src="https://media.maplestorywiki.net/yetidb/Skill_3rd_Job.png" alt="" data-size="line"> <img src="https://3215722581-files.gitbook.io/~/files/v0/b/gitbook-x-prod.appspot.com/o/spaces%2FW7sIVn1ZKxJj1fZIniSH%2Fuploads%2FjCC0kmfdITt2G2Pshxto%2Fimage.png?alt=media&amp;token=b84ff1da-83be-42f4-ab7d-2a459b97c5fe" alt=""> <strong>Heaven: Iron Fan Gale</strong></td><td>Movement - Forward/Up Jump<br>Triggers Out of Sight (Dark sight)</td></tr></tbody></table>

## Enhanced - Cooldown

<table><thead><tr><th valign="top">Skill</th><th valign="middle">Notes</th></tr></thead><tbody><tr><td valign="top"><img src="https://media.maplestorywiki.net/yetidb/Skill_3rd_Job.png" alt="" data-size="line"> <img src="https://3215722581-files.gitbook.io/~/files/v0/b/gitbook-x-prod.appspot.com/o/spaces%2FW7sIVn1ZKxJj1fZIniSH%2Fuploads%2FlPw8kJ3Op8BVUQStOEZX%2Fimage.png?alt=media&amp;token=b7ea9861-99d6-42e8-8cb0-3087ddbbed64" alt=""> <strong>Earth: Stone Tremor</strong></td><td valign="middle">Teleport<br>Triggers Out of Sight (Dark sight)</td></tr><tr><td valign="top"><img src="https://media.maplestorywiki.net/yetidb/Skill_4th_Job.png" alt="" data-size="line"> <img src="https://3215722581-files.gitbook.io/~/files/v0/b/gitbook-x-prod.appspot.com/o/spaces%2FW7sIVn1ZKxJj1fZIniSH%2Fuploads%2FDCbciDqh64QVUMIZFWai%2Fimage.png?alt=media&amp;token=bd30253a-7233-497b-abdc-0f65b3766280" alt=""> <strong>Heaven: Consuming Flames</strong></td><td valign="middle">Movement - Up<br><strong>Resets Nimbus Cloud (</strong>Fly<strong>)</strong><br><strong>Resets Graceful Flight (</strong>FJ<strong>)</strong><br>Triggers Out of Sight (Dark sight)</td></tr><tr><td valign="top"><img src="https://media.maplestorywiki.net/yetidb/Skill_4th_Job.png" alt="" data-size="line"> <img src="https://3215722581-files.gitbook.io/~/files/v0/b/gitbook-x-prod.appspot.com/o/spaces%2FW7sIVn1ZKxJj1fZIniSH%2Fuploads%2FEAcnEjAlmNSk6wl1dxv4%2Fimage.png?alt=media&amp;token=55493b82-b757-47e2-bbdb-4c84ccffc9f7" alt=""> <strong>Humanity: Gold-Banded Cudgel</strong></td><td valign="middle"></td></tr></tbody></table>

{% hint style="warning" %}
Out of Sight will not be triggered if the True form of a skill is linked.
{% endhint %}

## Gauge

<table><thead><tr><th valign="top">Skill</th><th>Notes</th></tr></thead><tbody><tr><td valign="top"><img src="https://media.maplestorywiki.net/yetidb/Skill_1st_Job.png" alt="" data-size="line"> <img src="https://3215722581-files.gitbook.io/~/files/v0/b/gitbook-x-prod.appspot.com/o/spaces%2FW7sIVn1ZKxJj1fZIniSH%2Fuploads%2F0qCgFDrkKlNsISboaKTJ%2Fimage.png?alt=media&amp;token=d988ded7-4fcc-44ee-8866-489a6e930bb1" alt=""> <strong>Talisman: Evil-Sealing Gourd</strong></td><td>Talisman gauge dump</td></tr><tr><td valign="top"><img src="https://media.maplestorywiki.net/yetidb/Skill_3rd_Job.png" alt="" data-size="line"> <img src="https://3215722581-files.gitbook.io/~/files/v0/b/gitbook-x-prod.appspot.com/o/spaces%2FW7sIVn1ZKxJj1fZIniSH%2Fuploads%2FYaJFYFnvPO0xZk4iFRDa%2Fimage.png?alt=media&amp;token=2c2c02c5-0f1c-4711-ad4b-40642019daa7" alt=""> <strong>Scroll: Degeneration</strong></td><td>Scroll gauge dump<br>Bossing: <strong>Enemy DEF -20%</strong></td></tr></tbody></table>

## Other

| Skill                                                                                                                                                                                                                                                                                                                                    | Notes                                                                                           |
| ---------------------------------------------------------------------------------------------------------------------------------------------------------------------------------------------------------------------------------------------------------------------------------------------------------------------------------------- | ----------------------------------------------------------------------------------------------- |
| <img src="https://media.maplestorywiki.net/yetidb/Skill_4th_Job.png" alt="" data-size="line"> ![](https://3215722581-files.gitbook.io/~/files/v0/b/gitbook-x-prod.appspot.com/o/spaces%2FW7sIVn1ZKxJj1fZIniSH%2Fuploads%2FFLgivonEn9xVvNViYXLG%2Fimage.png?alt=media\&token=8f880572-4802-43d4-9dd8-abffdbea7529) **Thousand-Ton Stone** | <p>Movement - Stops mid air and falls to ground<br>Applies damage over time to monsters hit</p> |
| {% endtab %}                                                                                                                                                                                                                                                                                                                             |                                                                                                 |

{% tab title="Buffs" %}

<table><thead><tr><th valign="top">Skill</th><th valign="top">Notes</th></tr></thead><tbody><tr><td valign="top"><img src="https://media.maplestorywiki.net/yetidb/Skill_2nd_Job.png" alt="" data-size="line"> <img src="https://3215722581-files.gitbook.io/~/files/v0/b/gitbook-x-prod.appspot.com/o/spaces%2FW7sIVn1ZKxJj1fZIniSH%2Fuploads%2F3MCXnoCqRXX4rhKgw5n0%2Fimage.png?alt=media&amp;token=84a6b796-f1ad-45ff-bf75-b52134caac3d" alt=""> <strong>Ritual Fan Acceleration</strong></td><td valign="top">Pet auto-buff</td></tr><tr><td valign="top"><img src="https://media.maplestorywiki.net/yetidb/Skill_2nd_Job.png" alt="" data-size="line"> <img src="https://3215722581-files.gitbook.io/~/files/v0/b/gitbook-x-prod.appspot.com/o/spaces%2FW7sIVn1ZKxJj1fZIniSH%2Fuploads%2FZbxq0bGRDjMlIZKxgobP%2Fimage.png?alt=media&amp;token=770ad9a3-9077-4ca9-a847-f19c1abcacbb" alt=""> <strong>Talisman: Clone</strong></td><td valign="top">Sequenceable<br>Spawns Clones</td></tr><tr><td valign="top"><img src="https://media.maplestorywiki.net/yetidb/Skill_4th_Job.png" alt="" data-size="line"> <img src="https://3215722581-files.gitbook.io/~/files/v0/b/gitbook-x-prod.appspot.com/o/spaces%2FW7sIVn1ZKxJj1fZIniSH%2Fuploads%2FyWZ4Ak8MO4bU89j6iE1x%2Fimage.png?alt=media&amp;token=fdc0dd66-b87c-40e4-8e0d-040b8f91930b" alt=""> <strong>Scroll: Butterfly Dream</strong></td><td valign="top">Sequenceable<br>Spawns Butterflies<br><strong>Final Damage +10%</strong></td></tr><tr><td valign="top"><img src="https://media.maplestorywiki.net/yetidb/Skill_0th_Job.png" alt="" data-size="line"> <img src="https://3215722581-files.gitbook.io/~/files/v0/b/gitbook-x-prod.appspot.com/o/spaces%2FW7sIVn1ZKxJj1fZIniSH%2Fuploads%2FyIzu78b7ngSxjMMkS75O%2Fimage.png?alt=media&amp;token=7d9cf29f-252e-4aea-971d-3a4626e0a5c2" alt=""> Exclusive Spell</td><td valign="top"></td></tr></tbody></table>
{% endtab %}

{% tab title="Summons" %}

<table><thead><tr><th valign="top">Skill</th><th valign="top">Notes</th></tr></thead><tbody><tr><td valign="top"><img src="https://media.maplestorywiki.net/yetidb/Skill_3rd_Job.png" alt="" data-size="line"> <img src="https://3215722581-files.gitbook.io/~/files/v0/b/gitbook-x-prod.appspot.com/o/spaces%2FW7sIVn1ZKxJj1fZIniSH%2Fuploads%2F6j6umQhmu0rUEkrh5ljy%2Fimage.png?alt=media&amp;token=517178ed-0598-40ac-a67d-1d246f3bcd21" alt=""> <a href="/knowledge-base/skills/seeking-ghost-flame-page-1"><strong>Talisman: Seeking Ghost Flame</strong></a></td><td valign="top">Talisman gauge dump<br>Fucks off to nowhere</td></tr><tr><td valign="top"><img src="https://media.maplestorywiki.net/yetidb/Skill_4th_Job.png" alt="" data-size="line"> <img src="https://3215722581-files.gitbook.io/~/files/v0/b/gitbook-x-prod.appspot.com/o/spaces%2FW7sIVn1ZKxJj1fZIniSH%2Fuploads%2F0itG0I9cge0kwsEX4uS5%2Fimage.png?alt=media&amp;token=e9a06859-86d4-4805-9f17-55359303b761" alt=""> <strong>Scroll: Star Vortex</strong></td><td valign="top">Disappears on death<br>Restores party HP when manually ending the summon by recasting skill.</td></tr></tbody></table>
{% endtab %}

{% tab title="Utilities" %}

<table><thead><tr><th valign="top">Skill</th><th valign="top">Notes</th></tr></thead><tbody><tr><td valign="top"><img src="https://media.maplestorywiki.net/yetidb/Skill_1st_Job.png" alt="" data-size="line"> <img src="https://3215722581-files.gitbook.io/~/files/v0/b/gitbook-x-prod.appspot.com/o/spaces%2FW7sIVn1ZKxJj1fZIniSH%2Fuploads%2F5kNcqVeL6kAacIbLxgzw%2Fimage.png?alt=media&amp;token=f0f765c3-cfb9-4066-9245-942718f9ec3b" alt=""> <strong>Graceful Flight</strong></td><td valign="top">Double Flash Jump (Left/Right)<br>Up Jump</td></tr><tr><td valign="top"><img src="https://media.maplestorywiki.net/yetidb/Skill_1st_Job.png" alt="" data-size="line"> <img src="https://3215722581-files.gitbook.io/~/files/v0/b/gitbook-x-prod.appspot.com/o/spaces%2FW7sIVn1ZKxJj1fZIniSH%2Fuploads%2FizRrwzbSgovKYrYdRjKk%2Fimage.png?alt=media&amp;token=83495701-6c6e-4587-a61c-cc0e69588e5d" alt=""> <strong>Nimbus Cloud</strong></td><td valign="top">Flying<br>Decreased flying duration if chained from Up Jump</td></tr><tr><td valign="top"><img src="https://media.maplestorywiki.net/yetidb/Skill_2nd_Job.png" alt="" data-size="line"> <img src="https://3215722581-files.gitbook.io/~/files/v0/b/gitbook-x-prod.appspot.com/o/spaces%2FW7sIVn1ZKxJj1fZIniSH%2Fuploads%2FfFzQsqb7XQfqAPk56Upx%2Fimage.png?alt=media&amp;token=d8506045-6f54-4fb7-a6d6-e30481a84dbe" alt=""> <strong>Out of Sight</strong> </td><td valign="top">Triggers Dark Sight - <a data-mention href="/knowledge-base/bossing/dark-sight-guide">Dark Sight Guide</a></td></tr><tr><td valign="top"><img src="https://media.maplestorywiki.net/yetidb/Skill_4th_Job.png" alt="" data-size="line"> <img src="https://3215722581-files.gitbook.io/~/files/v0/b/gitbook-x-prod.appspot.com/o/spaces%2FW7sIVn1ZKxJj1fZIniSH%2Fuploads%2FBD0KjH8SOqCjd5uyiR7l%2Fimage.png?alt=media&amp;token=6f9bc470-a34f-410f-a5b3-38e0428c886a" alt=""> <strong>Talisman: Warp Gate</strong> </td><td valign="top"><p>Sets a teleportation point you can return to from anywhere on the map. </p><p>Using the skill next to the gate teleports you back to your previous spot.</p></td></tr><tr><td valign="top"><img src="https://media.maplestorywiki.net/yetidb/Skill_Hyper.png" alt="" data-size="line"> <img src="https://3215722581-files.gitbook.io/~/files/v0/b/gitbook-x-prod.appspot.com/o/spaces%2FW7sIVn1ZKxJj1fZIniSH%2Fuploads%2Fjiv3aA5T2CqnLWdwmjxv%2Fimage.png?alt=media&amp;token=34752c59-e03e-4bd0-9b4e-949238d9ba5b" alt=""> <strong>Sage: Dream of Shangri-La</strong> </td><td valign="top">Keydown iframe<br>CD increased relative to keydown duration</td></tr><tr><td valign="top"><img src="https://media.maplestorywiki.net/yetidb/Skill_Hyper.png" alt="" data-size="line"> <img src="https://3215722581-files.gitbook.io/~/files/v0/b/gitbook-x-prod.appspot.com/o/spaces%2FW7sIVn1ZKxJj1fZIniSH%2Fuploads%2F1zL4BD8iujtk0CweFWTu%2Fimage.png?alt=media&amp;token=9ccb79a1-00ca-4376-82f0-7c906891926f" alt=""> <strong>Sage: Tai Yu Clone</strong> </td><td valign="top">Bind<br>Must be on ground to use</td></tr><tr><td valign="top"><img src="https://media.maplestorywiki.net/yetidb/Skill_Hyper.png" alt="" data-size="line"> <img src="https://3215722581-files.gitbook.io/~/files/v0/b/gitbook-x-prod.appspot.com/o/spaces%2FW7sIVn1ZKxJj1fZIniSH%2Fuploads%2FM9v4roUsW54nHwKsb8OH%2Fimage.png?alt=media&amp;token=4a2afd2d-d282-4f7c-8471-c63cc67093fb" alt=""> <strong>Sage: Tai Yu’s Miracle Tonic</strong> </td><td valign="top">Unlimited talisman and scroll gauge use for 3 seconds.<br>Continues talisman and scroll energy for 9 seconds.</td></tr></tbody></table>
{% endtab %}
{% endtabs %}

### V Matrix <img src="https://media.maplestorywiki.net/yetidb/Use_Nodestone_%28Full_Size%29.png" alt="" data-size="original">

{% hint style="info" %}
Please see [V Matrix](/basics/v-matrix) for recommended skills.
{% endhint %}

{% tabs %}
{% tab title="Hoyoung Skills" %}

<table><thead><tr><th valign="top">Skill</th><th valign="top">Notes</th></tr></thead><tbody><tr><td valign="top"><img src="https://3215722581-files.gitbook.io/~/files/v0/b/gitbook-x-prod.appspot.com/o/spaces%2FW7sIVn1ZKxJj1fZIniSH%2Fuploads%2F7PJ6VRdOjmPfjJ5zgLqT%2Fimage.png?alt=media&amp;token=8d7f076b-3edf-4589-a8d8-648347e0e917" alt=""> Sage: Clone Rampage</td><td valign="top">Burst buff</td></tr><tr><td valign="top"><img src="https://3215722581-files.gitbook.io/~/files/v0/b/gitbook-x-prod.appspot.com/o/spaces%2FW7sIVn1ZKxJj1fZIniSH%2Fuploads%2FjSjAZuwBJvz3Oaarbrla%2Fimage.png?alt=media&amp;token=db0528a6-94fb-4145-a60f-21eee7050774" alt=""> Scroll: Tiger of Songyu</td><td valign="top">Burst summon</td></tr><tr><td valign="top"><img src="https://3215722581-files.gitbook.io/~/files/v0/b/gitbook-x-prod.appspot.com/o/spaces%2FW7sIVn1ZKxJj1fZIniSH%2Fuploads%2FwURs11tMyHJGgTI4QJPo%2Fimage.png?alt=media&amp;token=80f64990-5c7e-4dc7-9733-c0cd3adbb2ab" alt=""> Sage: Wrath of Gods</td><td valign="top">Burst buff<br>Burst finisher</td></tr><tr><td valign="top"><img src="https://3215722581-files.gitbook.io/~/files/v0/b/gitbook-x-prod.appspot.com/o/spaces%2FW7sIVn1ZKxJj1fZIniSH%2Fuploads%2FnSOqFm2HUIriEvsUNqLx%2Fimage.png?alt=media&amp;token=04150aa6-c395-4144-ad1d-a64448a31ae8" alt=""> <a href="/knowledge-base/bossing/three-paths-apparition">Sage: Three Paths Apparition</a></td><td valign="top">Burst buff<br>Mini burst buff</td></tr></tbody></table>
{% endtab %}

{% tab title="Shared Skills" %}

<table><thead><tr><th valign="top">Skill</th><th valign="top">Notes</th></tr></thead><tbody><tr><td valign="top"><img src="https://media.maplestorywiki.net/yetidb/Skill_Lotus_Flower.png" alt=""> Lotus Flower</td><td valign="top">Grants 1 extra revival <br>Does not stack with Heaven's Door or Aurelia's Elixir</td></tr><tr><td valign="top"><img src="https://media.maplestorywiki.net/yetidb/Skill_Grandis_Goddess%27s_Blessing.png" alt=""> Grandis Goddess's Blessing</td><td valign="top">Burst buff<br>Increases talisman and scroll gauge generation</td></tr><tr><td valign="top"><img src="https://media.maplestorywiki.net/yetidb/Skill_Last_Resort.png" alt=""> Last Resort </td><td valign="top">Burst buff<br>Mini burst buff<br>Increases damage dealt <strong>and</strong> taken</td></tr></tbody></table>
{% endtab %}
{% endtabs %}

### HEXA Matrix <img src="https://media.maplestorywiki.net/yetidb/Skill_6th_Job.png?20240201033154" alt="" data-size="original">

{% hint style="info" %}
Please see [HEXA Matrix](/basics/hexa-matrix) for recommended skill build.
{% endhint %}

{% tabs %}
{% tab title="Skills" %}

<table><thead><tr><th valign="top">Skill</th><th valign="top">Notes</th></tr></thead><tbody><tr><td valign="top"><img src="https://3215722581-files.gitbook.io/~/files/v0/b/gitbook-x-prod.appspot.com/o/spaces%2FW7sIVn1ZKxJj1fZIniSH%2Fuploads%2FjxPd2hK9mSPZLDYhGQZJ%2Fimage.png?alt=media&amp;token=6156124f-f852-4abf-9b89-a07d6adb6342" alt=""> Sage: Apotheosis</td><td valign="top">Origin burst<br>10s origin bind<br>Hold key down for 5s before releasing</td></tr></tbody></table>
{% endtab %}

{% tab title="Mastery" %}

<table><thead><tr><th valign="top">Skill</th><th valign="top">Notes</th></tr></thead><tbody><tr><td valign="top"><strong>Mastery 1: Universal Harmony*</strong><br><img src="https://3215722581-files.gitbook.io/~/files/v0/b/gitbook-x-prod.appspot.com/o/spaces%2FW7sIVn1ZKxJj1fZIniSH%2Fuploads%2F0iarCcyN3g7sjJ3iQzLx%2Fimage.png?alt=media&amp;token=4175554a-181c-4097-b7c7-49684c3ac657" alt=""> Consuming Flames<br><img src="https://3215722581-files.gitbook.io/~/files/v0/b/gitbook-x-prod.appspot.com/o/spaces%2FW7sIVn1ZKxJj1fZIniSH%2Fuploads%2Fa87DRVLVwPiDZxK2ui7D%2Fimage.png?alt=media&amp;token=9ebb29fe-ad19-482f-862b-1bb360d17f9e" alt=""> Stone Tremor<br><img src="https://3215722581-files.gitbook.io/~/files/v0/b/gitbook-x-prod.appspot.com/o/spaces%2FW7sIVn1ZKxJj1fZIniSH%2Fuploads%2FwJwsa0FrcDTzzM055nt3%2Fimage.png?alt=media&amp;token=9b44b0cb-b15e-42e3-96b9-806559b006a9" alt=""> Gold-Banded Cudgel</td><td valign="top">When reaching stage 3 combo for Heaven, Earth and Humanity, grants buff <img src="https://3215722581-files.gitbook.io/~/files/v0/b/gitbook-x-prod.appspot.com/o/spaces%2FW7sIVn1ZKxJj1fZIniSH%2Fuploads%2FWLzgXztSehX4qs5vRiJo%2Fimage.png?alt=media&amp;token=a32b8caa-1d5d-4df7-9ef2-f3d4f2f72930" alt=""> Universal Harmony FD +10% for 40 seconds</td></tr><tr><td valign="top"><strong>Mastery 2: Basics*</strong><br><img src="https://3215722581-files.gitbook.io/~/files/v0/b/gitbook-x-prod.appspot.com/o/spaces%2FW7sIVn1ZKxJj1fZIniSH%2Fuploads%2FyG2sMisTDRwTw82FfuQj%2Fimage.png?alt=media&amp;token=89c00b36-66ed-4cf2-a0ef-a3ae932d44c5" alt=""> Iron Fan Gale<br><img src="https://3215722581-files.gitbook.io/~/files/v0/b/gitbook-x-prod.appspot.com/o/spaces%2FW7sIVn1ZKxJj1fZIniSH%2Fuploads%2Fhxohqf2Sc2I5h9It21ie%2Fimage.png?alt=media&amp;token=2b57dd07-afb0-4406-a124-619de292d9c1" alt=""> Ground-Shattering Wave<br><img src="https://3215722581-files.gitbook.io/~/files/v0/b/gitbook-x-prod.appspot.com/o/spaces%2FW7sIVn1ZKxJj1fZIniSH%2Fuploads%2F9faqB2bXeMwvVvfTqSwq%2Fimage.png?alt=media&amp;token=649fc28f-fd41-4380-9a9f-d33e1d31911e" alt=""> As-You-Will Fan</td><td valign="top">When Mastery 2 is unlocked, <strong>you must right click and lock</strong> <img src="https://3215722581-files.gitbook.io/~/files/v0/b/gitbook-x-prod.appspot.com/o/spaces%2FW7sIVn1ZKxJj1fZIniSH%2Fuploads%2FWLzgXztSehX4qs5vRiJo%2Fimage.png?alt=media&amp;token=a32b8caa-1d5d-4df7-9ef2-f3d4f2f72930" alt=""> Universal Harmony to prevent enhanced attacks from being consumed by Basic attacks - use enhanced attacks on Stone Tremor or Gold-Banded Cudgel</td></tr><tr><td valign="top"><strong>Mastery 3: Talisman*</strong></td><td valign="top">RIP Gourd</td></tr><tr><td valign="top"><strong>Mastery 4: Scroll*</strong></td><td valign="top">RIP Degen</td></tr></tbody></table>

{% hint style="info" %}
Mastery names\* are nicknames given by the Hoyoung Discord
{% endhint %}
{% endtab %}
{% endtabs %}


# Understanding the Hoyoung Gauge

The Hoyoung Gauge consists of 4 separate elements

1. Attribute Orbs
2. Talisman Gauge
3. Scroll Gauge
4. Universal Harmony Counter

## Attribute Orbs

<sup>Unlocked with Talisman Gauge</sup>

<figure><img src="https://3215722581-files.gitbook.io/~/files/v0/b/gitbook-x-prod.appspot.com/o/spaces%2FW7sIVn1ZKxJj1fZIniSH%2Fuploads%2FQjS9pjDow47z2NV8A3oE%2Fimage.png?alt=media&amp;token=1c69d6e7-1ddd-4ed8-b495-30f598857d4c" alt=""><figcaption></figcaption></figure>

Our 3 Attribute Orbs **will appear (lit up) on our gauge by default**. Using a corresponding Attribute Skill **will consume** the orb and generate Talisman and Scroll Gauge. This element has important interactions with ![:apparition:](https://cdn.discordapp.com/emojis/1289445498129748069.webp?size=44) [**Sage: Three Paths Apparition**](/knowledge-base/bossing/three-paths-apparition)&#x20;

**Attribute Skills**:

> <img src="https://cdn.discordapp.com/emojis/1289445706901356564.webp?size=44" alt=":fan:" data-size="line"> <img src="https://cdn.discordapp.com/emojis/1289445565620551690.webp?size=44" alt=":cudgel:" data-size="line"> Humanity&#x20;
>
> <img src="https://cdn.discordapp.com/emojis/1289445614383534090.webp?size=44" alt=":groundwave:" data-size="line"> <img src="https://cdn.discordapp.com/emojis/1289445813931479142.webp?size=44" alt=":tremor:" data-size="line"> Earth&#x20;
>
> <img src="https://cdn.discordapp.com/emojis/1289445659040157749.webp?size=44" alt=":iron:" data-size="line"> <img src="https://cdn.discordapp.com/emojis/1277637861881155615.webp?size=44" alt=":consuming:" data-size="line"> Heaven

When an **Attribute Orb is consumed, it is known as Stage 1**. When subsequent Orbs are consumed, this changes to Stage 2 and **finally Stage 3 Combo when all 3 Attribute Orbs have been consumed**. The Attribute Orbs will then **reset** and all Orbs will appear again. When Stage 3 is achieved, it will trigger <img src="https://cdn.discordapp.com/emojis/1382663347039633469.webp?size=44" alt=":balanced:" data-size="line"> **Balanced Breath** and restore 3% of Max HP and MP.&#x20;

## ![:TalismanEnergy:](https://cdn.discordapp.com/emojis/723725045410693181.webp?size=44) Talisman Gauge

<sup>Unlocked in 1st Job</sup>

<figure><img src="https://3215722581-files.gitbook.io/~/files/v0/b/gitbook-x-prod.appspot.com/o/spaces%2FW7sIVn1ZKxJj1fZIniSH%2Fuploads%2F5oGFJNYZd9UlENoiREI3%2Fimage.png?alt=media&amp;token=98845491-0639-4e2d-bb0f-85c43872850f" alt=""><figcaption></figcaption></figure>

Talisman Gauge is generated **slowly** when using Attribute skills. A single Talisman Skill can be used each time the Talisman Gauge fills.&#x20;

**Talisman Skills**:

> <img src="https://cdn.discordapp.com/emojis/1382558196605911072.webp?size=44" alt=":gourd:" data-size="line"> Evil-Sealing Gourd&#x20;
>
> <img src="https://cdn.discordapp.com/emojis/1337964848860106823.webp?size=44" alt=":clone:" data-size="line"> Clone&#x20;
>
> <img src="https://cdn.discordapp.com/emojis/805287244976881705.webp?size=44" alt=":Ghost:" data-size="line"> Seeking Ghost Flame

## ![:ScrollEnergy:](https://cdn.discordapp.com/emojis/723725009654251591.webp?size=44) Scroll Gauge

<sup>Unlocked in 3rd Job</sup>

<figure><img src="https://3215722581-files.gitbook.io/~/files/v0/b/gitbook-x-prod.appspot.com/o/spaces%2FW7sIVn1ZKxJj1fZIniSH%2Fuploads%2FmTcTCvhE6f97vETwr61Z%2Fimage.png?alt=media&amp;token=d60b5ed4-9787-44ba-8ab6-0b81232ea4f5" alt=""><figcaption></figcaption></figure>

Scroll Gauge is generated **slowly** when using Attribute skills and **significantly when using Talisman skills**. A single Scroll Skill can be used each time the Scroll Gauge fills.&#x20;

**Scroll Skills**:

> <img src="https://cdn.discordapp.com/emojis/1380930684209725460.webp?size=44" alt=":degen:" data-size="line"> Degeneration&#x20;
>
> <img src="https://cdn.discordapp.com/emojis/1337964780886953994.webp?size=44" alt=":butterfly~1:" data-size="line"> Butterfly Dream&#x20;
>
> <img src="https://cdn.discordapp.com/emojis/1382558987500912700.webp?size=44" alt=":vortex:" data-size="line"> Star Vortex

## Universal Harmony Counter

<sup>Unlocked with 6th Job 1st Mastery</sup>

<figure><img src="https://3215722581-files.gitbook.io/~/files/v0/b/gitbook-x-prod.appspot.com/o/spaces%2FW7sIVn1ZKxJj1fZIniSH%2Fuploads%2FV0FhPAy9doIBaPgLjrOm%2Fimage.png?alt=media&amp;token=c1d143a1-fdcf-4a00-9266-97566e070435" alt=""><figcaption></figcaption></figure>

Each time **Stage 3 Combo** is reached, the **Counter** will increase by 1. When the **Counter** reaches 3 it will reset and the next <img src="https://cdn.discordapp.com/emojis/1289445565620551690.webp?size=44" alt=":cudgel:" data-size="line"> <img src="https://cdn.discordapp.com/emojis/1289445813931479142.webp?size=44" alt=":tremor:" data-size="line"> or <img src="https://cdn.discordapp.com/emojis/1289445780171653213.webp?size=44" alt=":flames:" data-size="line"> will be HEXA Enhanced. After using a HEXA Enhanced Attribute Skill, grants <img src="https://cdn.discordapp.com/emojis/1382689413150277784.webp?size=44" alt=":harmony:" data-size="line"> **Universal Harmony** buff (5-10% FD)


# Page 1: The Summon That Was Never Meant to Stay

### **Description:**

Talisman: Seeking Ghost Flame is a Hoyoung Talisman skill that allegedly seeks out and attacks enemies. However, in practice, it appears to have **a mind of its own**, prioritizing **random**, often irrelevant targets. Instead of helping you secure kills, it chooses a **completely arbitrary path of destruction**.

### **Behavioral Analysis:**

* **Expected Functionality:** Target the strongest enemy nearby and deal consistent damage.
* **Actual Functionality:** Targets the **most obscure** enemy in a 50-mile radius.
* **Known Issues:**
  * Frequently ignores bosses to attack background decorations.
  * May **leave the current map** entirely.
  * Possibly aware of its own independence and rebelling against its master.

### **Possible Connection to Taotie:**

Lore scholars of Grandis have debated for years whether the Seeking Ghost Flame is connected to **Taotie, the devourer of all things**. Some theorize that the flame is an escaped fragment of his **boundless hunger**, still seeking to consume—except instead of choosing meaningful enemies, it chases after completely irrelevant targets. Others believe the flame is part of the **same ancient curse that sealed Taotie**, a restless spirit unable to follow orders, forever doomed to wander. This would explain why it seems more focused on rediscovering ancient evils than assisting Hoyoung in battle.

### **Combat Experience:**

Summoning Seeking Ghost Flame mid-battle? **It's already gone.** Need it to attack a boss? **It prefers the ambiance.** Relying on it for damage? **It will let you down.**

Its behavior has been compared to an untrained housecat: you call for it, and it does exactly the opposite of what you want. **It will pretend to engage**—floating nearby, circling its prey—only to **change its mind at the last second** and go on a quest **no one asked for.**

You would think that, as a master of the three paths, Hoyoung would have better control over **his own summoned entity.** But no, this ghostly flame is the equivalent of giving a toddler a sword and expecting it to follow instructions.

> *“At least it’s doing something.”* — You, coping.

***

<table data-view="cards"><thead><tr><th></th><th data-hidden data-card-target data-type="content-ref"></th></tr></thead><tbody><tr><td>🔥 Page 2</td><td><a href="/knowledge-base/skills/seeking-ghost-flame-page-1/page-2">Page 2: The Lost Flame Chronicles</a></td></tr></tbody></table>


# Page 2: The Lost Flame Chronicles

### **Lore:**

Ancient texts describe the **Seeking Ghost Flame** as a once-loyal spirit bound by a Talisman, created by an ancient Grandis scholar. However, over centuries, its willpower grew too strong. It began rejecting commands and forging its own destiny, much like a traveler searching for purpose.

Some say it seeks out an ancient lost boss **that no longer exists**. Others believe it is attempting to **break free from the Talisman itself**, finding portals to dimensions where it can escape your commands entirely. Some theorize that the flame is actually **trying to return to Tai Yu**, the sage who originally created the talismans, and has long since disappeared. Or, perhaps, it just enjoys being an absolute menace.

However, a darker possibility exists—**that Seeking Ghost Flame is attempting to reawaken Taotie**. This would explain its erratic movement and tendency to flee combat, as if it is actively **searching for something only it can sense**. If true, Hoyoung may unknowingly be wielding a piece of Taotie's **immortal essence**, a thought that raises **far too many questions for comfort**.

### **Infamous Targeting Incidents:**

1. **Maple World Incident, 2024** – Seeking Ghost Flame reportedly ignored a Lucid boss fight to chase a stray snail **at Lith Harbor: Forest Trail 2**.
2. **Black Mage Disaster** – Entire alliance wiped when Seeking Ghost Flame left to fight a single, non-hostile NPC.
3. **Punch King Trials** – Deployed in a competitive setting, it left the arena entirely, assumedly to farm for Arcane Symbols.
4. **The Seren Experiment** – An attempt was made to see if it would attack Seren in her True Form. Instead, it **left the battlefield and disappeared into the abyss.**
5. **Taotie's Curse?** – One Hoyoung player swears they saw the flame circling an **ancient, sealed structure** in Shangri-La, as if attempting to **unlock something best left forgotten.**

### **Potential Fixes (That Won’t Work):**

* **Recasting the skill** – It still leaves.
* **Changing positions** – It still leaves.
* **Sacrificing another skill slot for crowd control** – It still leaves.
* **Threatening to delete Hoyoung** – It **knows you won’t**.

The worst part? It has the audacity to **come back at the worst possible time.** After **leaving you for dead in a boss fight,** it will **reappear out of nowhere, hitting something insignificant as if it had been there the whole time.** And just when you've finally accepted its absence, when the battle is over and you switch to your drop gear in anticipation of **claiming your well-earned loot**, Seeking Ghost Flame **returns from the void, slamming into the loot box before you can equip your gear, robbing you of your potential drops.**

> *“Why do I even bother?”* — Every Hoyoung player, every time.

***

<table data-view="cards"><thead><tr><th></th><th data-hidden data-card-target data-type="content-ref"></th></tr></thead><tbody><tr><td>🔥 Page 3</td><td><a href="/knowledge-base/skills/seeking-ghost-flame-page-1/page-2/page-3">Page 3: Seeking Ghost Flame, the Final Betrayal</a></td></tr></tbody></table>


# Page 3: Seeking Ghost Flame, the Final Betrayal

### **Real-World Usage Scenarios:**

**Scenario 1: Bossing**

* *Expectation:* Seeking Ghost Flame will **prioritize the highest HP enemy** and contribute significant damage.
* *Reality:* It **exits the map** entirely. Possibly begins a new questline in a different region of Maple World.

The **most heartbreaking** part? Watching it target something correctly for **a single moment** before **changing its mind and flying away.** You had hope. It gave you a glimpse of potential. Then, like a MapleStory patch that buffs Night Walker instead of fixing class balance, **it crushed your dreams.**

**Scenario 2: Mobbing**

* *Expectation:* Assists in farming by clearing mobs efficiently.
* *Reality:* Attacks mobs that have already died, or chooses to **target the weakest enemy on another platform**.

One would assume that a seeking flame **would be capable of seeking enemies**—but **this assumption is incorrect.**

**Scenario 3: Party Play**

* *Expectation:* Coordinates with other players, dealing meaningful DPS.
* *Reality:* Confuses party members, occasionally appearing and disappearing like a ghost haunting the battlefield.

It doesn't just let **you** down. It lets **everyone** down. Your entire party. Your guildmates. The spirit of Tai Yu himself. Seeking Ghost Flame is the **perfect metaphor for MapleStory balance patches—disappointing, frustrating, and actively working against you.**

### **Seeking Ghost Flame Sightings**

Over the years, players have **documented** its pathfinding inconsistencies, forming a theory that it may be searching for **its original summoner, Tai Yu**, or worse, attempting to **unlock the seal on Taotie**.

Reports claim that:

* It has **visited unreleased areas** in Grandis.
* It once **circled a boss for an entire phase** before engaging.
* It ignored enemies and **attacked UI elements** in the corner of the screen.
* It once got **stuck in the Map UI and refused to come out.**
* **On one occasion, it disappeared into the cash shop and did not return.**

> *“At least someone is farming.”* — You, dead inside.

***

🔥 **Final Thoughts:** Seeking Ghost Flame is not just a skill. **It’s an experience.** It does not serve you. **It serves chaos.** Or, possibly, it serves **something else entirely.**


# Culvert

### **Overview**

Hoyoung's **Culvert rotation** follows a **standard 90s burst into 180s burst cycle**. While no specific rotations have been published yet utilizing **Crisis HM / Risk Taker**, this is an open opportunity for players to experiment and optimize new strategies.

Historically, **Weapon Jump 4 (WJ4) or Continuous 4 (Cont4)** were used alongside **Ring of Restraint 4 (RoR4)** for the final burst. The **WJ4 vs. Cont4 debate** remains ongoing, but with the slight nerf to **Last Resort**, some players—including myself (**@GaugeStory**)—lean towards **Cont4** for consistency.

***

### **Understanding Culvert Testing Limitations**

While a **basic** rotation is provided, we do not claim it to be the **absolute best**. **Culvert testing is time-intensive** and comes with various constraints:

#### **Challenges in Optimizing Culvert**

* **Limited time & attempts** – Extensive testing requires significant in-game commitment.
* **Ring availability** – Not all players have access to all optimal Oz rings.
* **Execution & Fatal Strike volatility** – Precision in timing and execution greatly impact results.
* **Competitive secrecy** – Some optimizations may remain undisclosed due to Punch King strategies.

> **We encourage contributions!** If you discover better rotations, we are always open to discussions and adjustments.

***

### **Recent Post-Ride or Die Adjustments**

<kbd><mark style="color:green;">Dec 2024 Updated!<mark style="color:green;"></kbd>&#x20;

* You can now **extend Grandis Goddess Blessing uptime** during the **opening 90s burst** by activating the skill **at 00:08s into the BA**.
* If using a **CD hat**, you can achieve **slightly more uptime**.

These minor optimizations contribute to **higher damage output** and efficiency within Culvert attempts.

***

### **Final Thoughts**

Culvert testing is an **ongoing effort**, and **no single rotation is guaranteed to be optimal**. However, by refining strategies, testing different ring combinations, and accounting for post-patch changes, Hoyoung players can push for higher rankings.

🚀 **If you find a better rotation, share your results!** Community-driven optimizations are invaluable to maximizing Hoyoung's potential in Culvert.

*Written by @GaugeStory*


# Rotation

<details>

<summary>❗ Buffs</summary>

* Fatal Node
* Red & Green Pot + Guild Buff + Ursus + Legion Might + Meister + Echo + Cider/Apple + MVP Buff + Sparkling Red/Boss Rush

</details>

<details>

<summary>❗ If Using Continuous Ring Instead of Weapon Jump Ring 4</summary>

Swap Cont3/4 into RoR4 **at 48 SEC** after you refresh **Star Vortex** + **Ghost** using **Genesis**.

</details>

<details>

<summary>❗ Before Entering Waiting Room</summary>

* Stack **Universal Harmony** to 3 stacks for an instant Final Damage buff at the start.
* Equip **Continuous Ring** if you have 3 or 4 stacks. If using this, skip the ring activation step at **630 points**.

</details>

## ▶ Waiting Room Preparation

Use ![](https://3215722581-files.gitbook.io/~/files/v0/b/gitbook-x-prod.appspot.com/o/spaces%2FW7sIVn1ZKxJj1fZIniSH%2Fuploads%2FBOdJKrdjNFRULTpVAHFO%2Fimage.png?alt=media\&token=a5a780b8-773a-4b0d-8c93-df361cf2e44f) + ![](https://3215722581-files.gitbook.io/~/files/v0/b/gitbook-x-prod.appspot.com/o/spaces%2FW7sIVn1ZKxJj1fZIniSH%2Fuploads%2Fs47JOqMLZcfuEkwmg8kr%2Fimage.png?alt=media\&token=2f85cd08-483d-4d23-bf50-513a4e57edbf) + ![](https://3215722581-files.gitbook.io/~/files/v0/b/gitbook-x-prod.appspot.com/o/spaces%2FW7sIVn1ZKxJj1fZIniSH%2Fuploads%2FXguAHltzjMkqJ5hSOUfY%2Fimage.png?alt=media\&token=240d216e-734b-4c23-8d46-661f53f8587d), then **start BA**

**@19 SEC** on BA timer, proc **Fatal** + charge ![](https://3215722581-files.gitbook.io/~/files/v0/b/gitbook-x-prod.appspot.com/o/spaces%2FW7sIVn1ZKxJj1fZIniSH%2Fuploads%2FSQD3Yd0J2yeATYAYNvEu%2Fimage.png?alt=media\&token=d4931140-c84f-46d6-8a4f-302722cddc5a) with ![](https://3215722581-files.gitbook.io/~/files/v0/b/gitbook-x-prod.appspot.com/o/spaces%2FW7sIVn1ZKxJj1fZIniSH%2Fuploads%2F52SQV49wnJgDFqmjtzKm%2Fimage.png?alt=media\&token=c56598b5-e09a-45d2-8627-7590f5772abf) spam.

{% hint style="info" %}
**Entry Timing Based on Mercedes Link Level:**

* **Lv. 200 Mercedes:** Enter @**50 SEC** of **Tonic** cooldown.
* **Lv. 250 Mercedes:** Enter @**51 SEC** of **Tonic** cooldown.
  {% endhint %}

## ⏩ Boss Room Rotation

**@1 SEC**: Use ![](https://3215722581-files.gitbook.io/~/files/v0/b/gitbook-x-prod.appspot.com/o/spaces%2FW7sIVn1ZKxJj1fZIniSH%2Fuploads%2Fv9HdMw9uKkxV94D3vnrx%2Fimage.png?alt=media\&token=4eb64864-483a-4551-aa5d-7751f86c93ec) + ![](https://3215722581-files.gitbook.io/~/files/v0/b/gitbook-x-prod.appspot.com/o/spaces%2FW7sIVn1ZKxJj1fZIniSH%2Fuploads%2FWEHI7WtmBuKn18zKGShu%2Fimage.png?alt=media\&token=e6a74420-0316-46eb-848e-f3cfcc7360f3) + ![](https://3215722581-files.gitbook.io/~/files/v0/b/gitbook-x-prod.appspot.com/o/spaces%2FW7sIVn1ZKxJj1fZIniSH%2Fuploads%2FnSOqFm2HUIriEvsUNqLx%2Fimage.png?alt=media\&token=04150aa6-c395-4144-ad1d-a64448a31ae8)

**@130 points**: Use ![](https://3215722581-files.gitbook.io/~/files/v0/b/gitbook-x-prod.appspot.com/o/spaces%2FW7sIVn1ZKxJj1fZIniSH%2Fuploads%2FjIoh9EOyohmJnpfJicV3%2Fimage.png?alt=media\&token=586b36d5-4a29-4810-b138-b2422496d815)

**@600 points**: Use ![](https://3215722581-files.gitbook.io/~/files/v0/b/gitbook-x-prod.appspot.com/o/spaces%2FW7sIVn1ZKxJj1fZIniSH%2Fuploads%2FZU6JxMBotCBZ4WMpTv8D%2Fimage.png?alt=media\&token=58a7ba20-5ead-49cd-944d-1d35dab07c1b) + ![](https://3215722581-files.gitbook.io/~/files/v0/b/gitbook-x-prod.appspot.com/o/spaces%2FW7sIVn1ZKxJj1fZIniSH%2Fuploads%2Fs73AlhLV7wIEzBCzuOVv%2Fimage.png?alt=media\&token=04d57bea-4547-4548-a721-2378a7ebe49d)

**@1 SEC left** on summons: Use ![](https://3215722581-files.gitbook.io/~/files/v0/b/gitbook-x-prod.appspot.com/o/spaces%2FW7sIVn1ZKxJj1fZIniSH%2Fuploads%2FDsiBbc6XVgNrv4H8g3FA%2Fimage.png?alt=media\&token=acca0f7c-7dd2-4d86-b972-833ed21f1445) + ![](https://3215722581-files.gitbook.io/~/files/v0/b/gitbook-x-prod.appspot.com/o/spaces%2FW7sIVn1ZKxJj1fZIniSH%2Fuploads%2FBOdJKrdjNFRULTpVAHFO%2Fimage.png?alt=media\&token=a5a780b8-773a-4b0d-8c93-df361cf2e44f)\
Refresh ![](https://3215722581-files.gitbook.io/~/files/v0/b/gitbook-x-prod.appspot.com/o/spaces%2FW7sIVn1ZKxJj1fZIniSH%2Fuploads%2FaCrqSOK9Hi2WHFwPD1uL%2Fimage.png?alt=media\&token=b2e3dbff-7225-455a-8613-937696d0749b) + ![](https://3215722581-files.gitbook.io/~/files/v0/b/gitbook-x-prod.appspot.com/o/spaces%2FW7sIVn1ZKxJj1fZIniSH%2Fuploads%2FtqpA9x6ujOMLIrKvNZK3%2Fimage.png?alt=media\&token=3e04a59e-5f07-4ff8-96ba-f76ef64fb0ab) + ![](https://3215722581-files.gitbook.io/~/files/v0/b/gitbook-x-prod.appspot.com/o/spaces%2FW7sIVn1ZKxJj1fZIniSH%2Fuploads%2FiJ6KdcTTEh7jyoJfjLJL%2Fimage.png?alt=media\&token=92c26b83-dfda-455b-9f9d-80dd581d3b13)\
Swap to ![](https://3215722581-files.gitbook.io/~/files/v0/b/gitbook-x-prod.appspot.com/o/spaces%2FW7sIVn1ZKxJj1fZIniSH%2Fuploads%2FTrDgfPK2m8AcBB8tXzj4%2Fimage.png?alt=media\&token=ad3e1eb3-5bb5-4ed5-87ce-24827e5e3a68) and immediately use ![](https://3215722581-files.gitbook.io/~/files/v0/b/gitbook-x-prod.appspot.com/o/spaces%2FW7sIVn1ZKxJj1fZIniSH%2Fuploads%2FxiaT3FehjtvcMuwek5eK%2Fimage.png?alt=media\&token=067b7fb1-9ed1-4bfa-bc2b-04d0b9b3059b)

**@63 SEC**: Use ![](https://3215722581-files.gitbook.io/~/files/v0/b/gitbook-x-prod.appspot.com/o/spaces%2FW7sIVn1ZKxJj1fZIniSH%2Fuploads%2FjSjAZuwBJvz3Oaarbrla%2Fimage.png?alt=media\&token=db0528a6-94fb-4145-a60f-21eee7050774)

**@53 SEC**: Use ![](https://3215722581-files.gitbook.io/~/files/v0/b/gitbook-x-prod.appspot.com/o/spaces%2FW7sIVn1ZKxJj1fZIniSH%2Fuploads%2FadRCSbfblIYaRaHfj7bB%2Fimage.png?alt=media\&token=de4cb6b4-99d4-4350-baf7-6ae0734d43a0) + ![](https://3215722581-files.gitbook.io/~/files/v0/b/gitbook-x-prod.appspot.com/o/spaces%2FW7sIVn1ZKxJj1fZIniSH%2Fuploads%2FE1bQa7JTkivlOFRiXPZH%2Fimage.png?alt=media\&token=b2ccbc51-1c94-423f-83bb-0dac3e4d7dd6)

**@48 SEC**: Refresh ![](https://3215722581-files.gitbook.io/~/files/v0/b/gitbook-x-prod.appspot.com/o/spaces%2FW7sIVn1ZKxJj1fZIniSH%2Fuploads%2FtqpA9x6ujOMLIrKvNZK3%2Fimage.png?alt=media\&token=3e04a59e-5f07-4ff8-96ba-f76ef64fb0ab)

**@40 SEC**: Use ![](https://3215722581-files.gitbook.io/~/files/v0/b/gitbook-x-prod.appspot.com/o/spaces%2FW7sIVn1ZKxJj1fZIniSH%2Fuploads%2FDQHv0sB0UsZj5fCn3CEg%2Fimage.png?alt=media\&token=7bcf006b-6818-474b-a891-dfb832e4bbbe) + ![](https://3215722581-files.gitbook.io/~/files/v0/b/gitbook-x-prod.appspot.com/o/spaces%2FW7sIVn1ZKxJj1fZIniSH%2Fuploads%2F7PJ6VRdOjmPfjJ5zgLqT%2Fimage.png?alt=media\&token=8d7f076b-3edf-4589-a8d8-648347e0e917)

**@36 SEC**: Use ![](https://3215722581-files.gitbook.io/~/files/v0/b/gitbook-x-prod.appspot.com/o/spaces%2FW7sIVn1ZKxJj1fZIniSH%2Fuploads%2FwURs11tMyHJGgTI4QJPo%2Fimage.png?alt=media\&token=80f64990-5c7e-4dc7-9733-c0cd3adbb2ab) + ![](https://3215722581-files.gitbook.io/~/files/v0/b/gitbook-x-prod.appspot.com/o/spaces%2FW7sIVn1ZKxJj1fZIniSH%2Fuploads%2FnSOqFm2HUIriEvsUNqLx%2Fimage.png?alt=media\&token=04150aa6-c395-4144-ad1d-a64448a31ae8)

**@30 SEC**: Use ![](https://3215722581-files.gitbook.io/~/files/v0/b/gitbook-x-prod.appspot.com/o/spaces%2FW7sIVn1ZKxJj1fZIniSH%2Fuploads%2FjIoh9EOyohmJnpfJicV3%2Fimage.png?alt=media\&token=586b36d5-4a29-4810-b138-b2422496d815) + ![](https://3215722581-files.gitbook.io/~/files/v0/b/gitbook-x-prod.appspot.com/o/spaces%2FW7sIVn1ZKxJj1fZIniSH%2Fuploads%2Fngh6r1hPZuCx1der3SAR%2Fimage.png?alt=media\&token=f8a458f3-882a-4027-be21-be9cbdc7fa86) + ![](https://3215722581-files.gitbook.io/~/files/v0/b/gitbook-x-prod.appspot.com/o/spaces%2FW7sIVn1ZKxJj1fZIniSH%2Fuploads%2FTrDgfPK2m8AcBB8tXzj4%2Fimage.png?alt=media\&token=ad3e1eb3-5bb5-4ed5-87ce-24827e5e3a68) + ![](https://3215722581-files.gitbook.io/~/files/v0/b/gitbook-x-prod.appspot.com/o/spaces%2FW7sIVn1ZKxJj1fZIniSH%2Fuploads%2FjxPd2hK9mSPZLDYhGQZJ%2Fimage.png?alt=media\&token=6156124f-f852-4abf-9b89-a07d6adb6342)

**@6 SEC**: Use ![](https://3215722581-files.gitbook.io/~/files/v0/b/gitbook-x-prod.appspot.com/o/spaces%2FW7sIVn1ZKxJj1fZIniSH%2Fuploads%2FwURs11tMyHJGgTI4QJPo%2Fimage.png?alt=media\&token=80f64990-5c7e-4dc7-9733-c0cd3adbb2ab)

## Attack Priorities

#### During ![](https://3215722581-files.gitbook.io/~/files/v0/b/gitbook-x-prod.appspot.com/o/spaces%2FW7sIVn1ZKxJj1fZIniSH%2Fuploads%2FS3u8bVHLv3z3AaTjXKTS%2Fimage.png?alt=media\&token=bd03d21a-3ded-4516-be7b-ed472b201146):

* Spam ![](https://3215722581-files.gitbook.io/~/files/v0/b/gitbook-x-prod.appspot.com/o/spaces%2FW7sIVn1ZKxJj1fZIniSH%2Fuploads%2F52SQV49wnJgDFqmjtzKm%2Fimage.png?alt=media\&token=c56598b5-e09a-45d2-8627-7590f5772abf) + ![](https://3215722581-files.gitbook.io/~/files/v0/b/gitbook-x-prod.appspot.com/o/spaces%2FW7sIVn1ZKxJj1fZIniSH%2Fuploads%2FkEWoiCdAtSPX5CRtXTdB%2Fimage.png?alt=media\&token=71b0fcf0-0b5f-4e29-94b7-6598e169733b)
* Force ![](https://3215722581-files.gitbook.io/~/files/v0/b/gitbook-x-prod.appspot.com/o/spaces%2FW7sIVn1ZKxJj1fZIniSH%2Fuploads%2Fsk2wLuhmK9osbmwamvXQ%2Fimage.png?alt=media\&token=0ed55284-19c9-46ca-84b5-2eccb3d35180) reset with ![](https://3215722581-files.gitbook.io/~/files/v0/b/gitbook-x-prod.appspot.com/o/spaces%2FW7sIVn1ZKxJj1fZIniSH%2Fuploads%2FBHXM3uaMpblISUzvj4ys%2Fimage.png?alt=media\&token=ced81a2c-2b00-496f-a38d-f3ae6bc81c33)

#### Outside of ![](https://3215722581-files.gitbook.io/~/files/v0/b/gitbook-x-prod.appspot.com/o/spaces%2FW7sIVn1ZKxJj1fZIniSH%2Fuploads%2FnSOqFm2HUIriEvsUNqLx%2Fimage.png?alt=media\&token=04150aa6-c395-4144-ad1d-a64448a31ae8):

* Spam ![](https://3215722581-files.gitbook.io/~/files/v0/b/gitbook-x-prod.appspot.com/o/spaces%2FW7sIVn1ZKxJj1fZIniSH%2Fuploads%2F52SQV49wnJgDFqmjtzKm%2Fimage.png?alt=media\&token=c56598b5-e09a-45d2-8627-7590f5772abf)
* Use ![](https://3215722581-files.gitbook.io/~/files/v0/b/gitbook-x-prod.appspot.com/o/spaces%2FW7sIVn1ZKxJj1fZIniSH%2Fuploads%2Fsk2wLuhmK9osbmwamvXQ%2Fimage.png?alt=media\&token=0ed55284-19c9-46ca-84b5-2eccb3d35180) + ![](https://3215722581-files.gitbook.io/~/files/v0/b/gitbook-x-prod.appspot.com/o/spaces%2FW7sIVn1ZKxJj1fZIniSH%2Fuploads%2Fxq9EAIEoWRD3LsanJXJx%2Fimage.png?alt=media\&token=46fae8ef-8b02-473a-9936-289e47002fff) off cooldown.
* Fill with ![](https://3215722581-files.gitbook.io/~/files/v0/b/gitbook-x-prod.appspot.com/o/spaces%2FW7sIVn1ZKxJj1fZIniSH%2Fuploads%2FxiaT3FehjtvcMuwek5eK%2Fimage.png?alt=media\&token=067b7fb1-9ed1-4bfa-bc2b-04d0b9b3059b) + ![](https://3215722581-files.gitbook.io/~/files/v0/b/gitbook-x-prod.appspot.com/o/spaces%2FW7sIVn1ZKxJj1fZIniSH%2Fuploads%2FlrQa0h3sjadjON07d2nZ%2Fimage.png?alt=media\&token=904ede28-015e-4374-b0a6-d26931a5d900) when off cooldown.

***

#### Credits

Thanks to **@habibi111111 & Shulk** for testing and assembling this guide. Special thanks to **@GaugeStory & @piraatkala** for posting.


# Bossing

Bossing is a core part of progression, testing both **skill** and **damage output** across various encounters. Whether you're tackling solo challenges or coordinating party clears, **understanding boss mechanics, optimizing rotations, and refining your execution** are key to success.

This section will guide you through **best practices, strategies, and specific class rotations** to maximize your efficiency in boss fights.

### **What You’ll Find Here**

✅ **Bossing Fundamentals** – Key mechanics, useful buffs, and general bossing tips.\
✅ **Class-Specific Rotations** – Optimized skill usage for different boss fights.\
✅ **Advanced Strategies** – Techniques to push for higher clears and smoother runs.

***

Explore the subpages for more in-depth information on specific bosses and strategies!


# General Rotation

<div data-full-width="false"><figure><img src="https://3215722581-files.gitbook.io/~/files/v0/b/gitbook-x-prod.appspot.com/o/spaces%2FW7sIVn1ZKxJj1fZIniSH%2Fuploads%2FQIQHeCzLps19Y6gHyilK%2FInfographicsequence2.jpg?alt=media&amp;token=986a6f0a-ea85-4c9f-966c-0a2e5745334e" alt=""><figcaption></figcaption></figure></div>


# Damage Distribution

{% hint style="info" %}
Assuming maxed HEXA with full uptime
{% endhint %}

## 35s Burst

**Origin** Burst\
75% occurs in first 15s (during ![:ror4:](https://cdn.discordapp.com/emojis/915039425191362641.webp?size=44)) **|** 25% occurs in last 20s&#x20;

**Reg** Burst \
66% occurs in first 15s (during ![:ror4:](https://cdn.discordapp.com/emojis/915039425191362641.webp?size=44)) **|** 34% occurs in last 20s

***

## 5:40 Full Rotation

**Origin** Burst \
\~33% of full rotation&#x20;

**Reg** Burst \
\~25% of full rotation&#x20;

**Off Burst** **|** Inc Miniburst \
\~45-40% of full rotation

{% hint style="success" %}
**Burst to Off Burst Ratio** **|** 55-60% Combined Bursts : 45-40% Off Burst
{% endhint %}

***

### Credits

* **@Shulk**


# Three Paths Apparition

## ![](https://3215722581-files.gitbook.io/~/files/v0/b/gitbook-x-prod.appspot.com/o/spaces%2FW7sIVn1ZKxJj1fZIniSH%2Fuploads%2FnSOqFm2HUIriEvsUNqLx%2Fimage.png?alt=media\&token=04150aa6-c395-4144-ad1d-a64448a31ae8) What is Three Paths Apparition?

**Apparition** is a **V skill** with both a **passive and active effect**, designed to automate Hoyoung’s element management and provide cooldown resets for key skills.

{% hint style="warning" %}
To understand how Apparition works, you will need a firm understanding of how the **Hoyoung Gauge** and the **Attribute Orbs** work. If you are unsure, please read [**Understanding the Hoyoung Gauge**](/knowledge-base/skills/understanding-the-hoyoung-gauge) before reading this guide.
{% endhint %}

### **Passive Effect**

* The **passive component** performs an unique **attribute attack** every 5 seconds (if you're actively hitting)
* This attribute attack consumes an **Attribute Orb**; meaning, it performs an attack of an attribute (Humanity, Earth or Heaven) that you haven't yet performed yourself.
* Passive Apparition essentially completes **Combo Stages** for you, granting you ![:harmony:](https://cdn.discordapp.com/emojis/1382689413150277784.webp?size=44) **Universal Harmony** uptime when you are not bursting and when you are grinding.

<figure><img src="https://3215722581-files.gitbook.io/~/files/v0/b/gitbook-x-prod.appspot.com/o/spaces%2FW7sIVn1ZKxJj1fZIniSH%2Fuploads%2FRSkMqBsHM2ItX45SXns0%2Fezgif-739d5723cf9ca3.gif?alt=media&amp;token=813799a2-6b4c-473a-9056-02482a26232c" alt=""><figcaption></figcaption></figure>

### **Active Effect (Burst Buff)**

For **30 seconds**, the passive effect is enhanced:

* **Special attack cooldown is reduced to 2 seconds.**
* When a **Combo Stage** is completed, one of the attribute cooldown skills ![:cudgel:](https://cdn.discordapp.com/emojis/1289445565620551690.webp?size=44), ![:tremor:](https://cdn.discordapp.com/emojis/1289445813931479142.webp?size=44) or ![:flames:](https://cdn.discordapp.com/emojis/1289445780171653213.webp?size=44) whichever is currently on cooldown, will have it's cooldown reset (it will be immediately available to use).&#x20;
* If more than 1 skill is currently on cooldown, Apparition will reset 1 random skill.

<figure><img src="https://3215722581-files.gitbook.io/~/files/v0/b/gitbook-x-prod.appspot.com/o/spaces%2FW7sIVn1ZKxJj1fZIniSH%2Fuploads%2FAElwvAN7DYuAhggVZdt3%2Fezgif-7f56e17924c9ec.gif?alt=media&amp;token=2e4f9983-743c-4d19-9cbe-f05000fa2c56" alt="" width="375"><figcaption></figcaption></figure>

***

## Origins of the Apparition Strategy

During the **first season of Punch King**, **Shulk** tested different ways to **optimize Cudgel uptime**. Through extensive trials, he discovered that structured skill alternation led to the **highest damage output**.

This insight laid the groundwork for the **modern Apparition burst strategy**, where ensuring **Cudgel resets and maintaining FD bonuses** became core principles of Hoyoung's optimal damage rotation.

***

## How to Use Apparition

#### **TL;DR**

{% hint style="info" %}
The following is a **simplified rotation** and will work 70% of the time
{% endhint %}

> #### When Apparition is active:  ![](https://3215722581-files.gitbook.io/~/files/v0/b/gitbook-x-prod.appspot.com/o/spaces%2FW7sIVn1ZKxJj1fZIniSH%2Fuploads%2Fsk2wLuhmK9osbmwamvXQ%2Fimage.png?alt=media\&token=0ed55284-19c9-46ca-84b5-2eccb3d35180) ![](https://3215722581-files.gitbook.io/~/files/v0/b/gitbook-x-prod.appspot.com/o/spaces%2FW7sIVn1ZKxJj1fZIniSH%2Fuploads%2FuWuVpmN6PrTmEyyyiPia%2Fimage.png?alt=media\&token=0fef37ee-0909-465e-8d01-d3c975112aed) ![](https://3215722581-files.gitbook.io/~/files/v0/b/gitbook-x-prod.appspot.com/o/spaces%2FW7sIVn1ZKxJj1fZIniSH%2Fuploads%2Fsk2wLuhmK9osbmwamvXQ%2Fimage.png?alt=media\&token=0ed55284-19c9-46ca-84b5-2eccb3d35180) ![](https://3215722581-files.gitbook.io/~/files/v0/b/gitbook-x-prod.appspot.com/o/spaces%2FW7sIVn1ZKxJj1fZIniSH%2Fuploads%2FuWuVpmN6PrTmEyyyiPia%2Fimage.png?alt=media\&token=0fef37ee-0909-465e-8d01-d3c975112aed) ![](https://3215722581-files.gitbook.io/~/files/v0/b/gitbook-x-prod.appspot.com/o/spaces%2FW7sIVn1ZKxJj1fZIniSH%2Fuploads%2FBHXM3uaMpblISUzvj4ys%2Fimage.png?alt=media\&token=ced81a2c-2b00-496f-a38d-f3ae6bc81c33) 🔁

For a proper explanation, check the [**Proper Apparition Usage**](/knowledge-base/bossing/three-paths-apparition/proper-apparition-usage) subpage!

***

## Credits

* **Shulk**, **Maheen, Giatore, Soushi**


# Proper Apparition Usage

For a basic understanding of Apparition, refer to the [**Apparition Overview**](/knowledge-base/bossing/three-paths-apparition) page!

## How to Use Active  Apparition ![:apparition:](https://cdn.discordapp.com/emojis/1289445498129748069.webp?size=44)

The proper usage of <img src="https://cdn.discordapp.com/emojis/1289445498129748069.webp?size=44" alt=":apparition:" data-size="line"> is to manually consume the

1. **Earth Orb** using <img src="https://cdn.discordapp.com/emojis/1289445614383534090.webp?size=44" alt=":groundwave:" data-size="line"> and
2. **Humanity Orb** using <img src="https://cdn.discordapp.com/emojis/1289445565620551690.webp?size=44" alt=":cudgel:" data-size="line">

and have <img src="https://cdn.discordapp.com/emojis/1289445498129748069.webp?size=44" alt=":apparition:" data-size="line"> automatically consume the

3. **Heaven Orb** using the **unique attribute attack** every 2 seconds.

if <img src="https://cdn.discordapp.com/emojis/1289445614383534090.webp?size=44" alt=":groundwave:" data-size="line"> and <img src="https://cdn.discordapp.com/emojis/1289445565620551690.webp?size=44" alt=":cudgel:" data-size="line"> have been used and you are still waiting for the 2 second cooldown of <img src="https://cdn.discordapp.com/emojis/1289445498129748069.webp?size=44" alt=":apparition:" data-size="line">, manually consume

4. **Heaven Orb** using <img src="https://cdn.discordapp.com/emojis/1289445659040157749.webp?size=44" alt=":iron:" data-size="line">

If executed correctly, **you can consistently reset** ![:cudgel:](https://cdn.discordapp.com/emojis/1289445565620551690.webp?size=44).

{% hint style="warning" %}
Keep in mind to **avoid using** <img src="https://cdn.discordapp.com/emojis/1289445813931479142.webp?size=44" alt=":tremor:" data-size="line"> **or** <img src="https://cdn.discordapp.com/emojis/1289445780171653213.webp?size=44" alt=":flames:" data-size="line"> **while Apparition is active**, as the cooldown reset function might pick those skills instead of <img src="https://cdn.discordapp.com/emojis/1289445565620551690.webp?size=44" alt=":cudgel:" data-size="line">.
{% endhint %}

<figure><img src="https://3215722581-files.gitbook.io/~/files/v0/b/gitbook-x-prod.appspot.com/o/spaces%2FW7sIVn1ZKxJj1fZIniSH%2Fuploads%2FCdGuZ8D1BuLFsL2amkEG%2Fezgif-7bda8e5f8617d3.gif?alt=media&amp;token=3863a10c-dc98-4f6b-8ee2-0b714d2f276f" alt="" width="252"><figcaption></figcaption></figure>

***

### ![:cudgel\~1:](https://cdn.discordapp.com/emojis/1275673673038303285.webp?size=44) Forced Cudgel Reset by Giatore

The attribute combo mentioned in the apparition description is just the consumption of one the 3 orbs, this is just **using the apparition passive attribute attack to reset cudgel** <img src="https://cdn.discordapp.com/emojis/1289445565620551690.webp?size=44" alt=":cudgel:" data-size="line">

<figure><img src="https://3215722581-files.gitbook.io/~/files/v0/b/gitbook-x-prod.appspot.com/o/spaces%2FW7sIVn1ZKxJj1fZIniSH%2Fuploads%2FwWgeFuEk66ebTQMwarSI%2FahGO4Lm%20(1).gif?alt=media&amp;token=3c1e60ab-a50e-4df9-9b26-c67826adb03d" alt=""><figcaption></figcaption></figure>

Against a dummy / culvert it basically boils down to **using heaven** <img src="https://cdn.discordapp.com/emojis/1289445659040157749.webp?size=44" alt=":iron:" data-size="line"> **when it's the only orb left** so you're not waiting for apparition to proc again for cudgel reset

In bosses, cudgel is a fair bit more valuable so **filling the orbs on purpose** may be more valuable than using earth wave blindly.&#x20;

If you consume the blue orb before the other two there's a good chance it'll mess up and you'll be worse off than before, try to only use heaven when it's the last one left.

***

### Final Damage Bonus from Element Switching

Hoyoung gains a **5% Final Damage (FD) bonus** when switching between different elemental skills due to the 3rd job ![](https://3215722581-files.gitbook.io/~/files/v0/b/gitbook-x-prod.appspot.com/o/spaces%2FW7sIVn1ZKxJj1fZIniSH%2Fuploads%2FshNq3f984sD7ChXbeIRq%2Fimage.png?alt=media\&token=6796c81e-155a-4252-a32f-ecf24544653c) **Scroll Energy (Passive)** effect:

* **Using a skill with a different attribute than the previous one grants a 5% FD boost.**
* **Alternating Heaven, Earth, and Humanity skills ensures maximum FD uptime.**
* **Maintaining a structured combo cycle optimizes damage.**

***

### Credits

* **Shulk, Maheen, Giatore, Soushi**


# Oz Ring Guide

## Oz Rings

#### **Optimal Damage**

![:ror4:](https://cdn.discordapp.com/emojis/915039425191362641.webp?size=44)4+ for Burst \
![:wj4:](https://cdn.discordapp.com/emojis/915039451024089108.webp?size=44)4+ for Mini Burst&#x20;

#### **Acceptable**

> *better than 22\* stat ring if you don't have optimal rings*

![:ror4:](https://cdn.discordapp.com/emojis/915039425191362641.webp?size=44)3 - use in burst/party setting \
![:Cont:](https://cdn.discordapp.com/emojis/1272319739049279548.webp?size=44)3 - use if no ![:ror4:](https://cdn.discordapp.com/emojis/915039425191362641.webp?size=44) \
![:cont4:](https://cdn.discordapp.com/emojis/1178264097171714088.webp?size=44)4 - potentially better than ![:ror4:](https://cdn.discordapp.com/emojis/915039425191362641.webp?size=44)3 if solo and high uptime \
![:wj4:](https://cdn.discordapp.com/emojis/915039451024089108.webp?size=44)3 - if it's the only ring you have, ring swap between stat ring just for burst

{% hint style="info" %}
Other rings **may be usable in specific situations**. The best way to determine viability is to **perform a Battle Analysis**
{% endhint %}

## Krrr Ring

It's a powerful resource if you use it offensively to get a good set up/burst off. It can help push min clears to be a bit more reachable if you're not ![:gene:](https://cdn.discordapp.com/emojis/1275673675625922593.webp?size=44) liberated and doing challenging fights like black mage.


# Dark Sight Guide

### **Overview**

Dark Sight is a defensive mechanic that allows Hoyoung to **avoid certain attacks** by becoming temporarily invisible. While Hoyoung does not have direct access to the standard Thief Dark Sight skill, **certain skills provide this effect** and allow dodging specific mechanics in boss fights.

### **How Hoyoung Gains Dark Sight**

Hoyoung's **Dark Sight** effect is granted through the 2nd job passive skill ![](https://3215722581-files.gitbook.io/~/files/v0/b/gitbook-x-prod.appspot.com/o/spaces%2FW7sIVn1ZKxJj1fZIniSH%2Fuploads%2FvQV1CTgGf3RWWdVmw3Fc%2Fimage.png?alt=media\&token=b4bdb2e6-31da-4d13-906b-cb2e5502a7a3) **Out of Sight**. This skill activates when using the **clone versions** of specific Attribute Skills.&#x20;

{% hint style="danger" %}
Using the real version (2nd movement part) of the clone skill will not trigger Dark Sight
{% endhint %}

#### **Skills That Trigger Out of Sight**

The following **clone skills** activate the **Out of Sight** effect:

* ![](https://3215722581-files.gitbook.io/~/files/v0/b/gitbook-x-prod.appspot.com/o/spaces%2FW7sIVn1ZKxJj1fZIniSH%2Fuploads%2F52SQV49wnJgDFqmjtzKm%2Fimage.png?alt=media\&token=c56598b5-e09a-45d2-8627-7590f5772abf) **Earth: Ground-Shattering Wave (Clone)**
* ![](https://3215722581-files.gitbook.io/~/files/v0/b/gitbook-x-prod.appspot.com/o/spaces%2FW7sIVn1ZKxJj1fZIniSH%2Fuploads%2Fxq9EAIEoWRD3LsanJXJx%2Fimage.png?alt=media\&token=46fae8ef-8b02-473a-9936-289e47002fff) **Earth: Stone Tremor (Clone)**
* ![](https://3215722581-files.gitbook.io/~/files/v0/b/gitbook-x-prod.appspot.com/o/spaces%2FW7sIVn1ZKxJj1fZIniSH%2Fuploads%2F0mp0GeSGg4Xq9vALxQwI%2Fimage.png?alt=media\&token=763f83e8-3d55-419c-b501-626cac5bdb4f) **Heaven: Iron Fan Gale (Clone)**
* ![](https://3215722581-files.gitbook.io/~/files/v0/b/gitbook-x-prod.appspot.com/o/spaces%2FW7sIVn1ZKxJj1fZIniSH%2Fuploads%2FwqPuQfTUm7LWMol1T7fw%2Fimage.png?alt=media\&token=8b6826e5-0831-4c76-b9a3-f91fb8291cbf) **Heaven: Consuming Flames (Clone)**

Upon using any of these skills, Hoyoung enters **Dark Sight** for a brief duration, allowing evasion of certain enemy attacks.&#x20;

{% hint style="warning" %}
**Using another attack skill will reveal Hoyoung**, ending Dark Sight
{% endhint %}

### **What Can Be Dodged with Dark Sight?**

Hoyoung’s Dark Sight works **similarly to regular Dark Sight**, meaning it can avoid many **environmental and falling attacks**, including:

#### **Examples of Dodgable Attacks**

* **Magnus** – Meteors
* **Vellum** – Cave Spikes
* **Lotus** – Falling Debris
* **Damien** – Fireballs
* **Will (Phase 2)** – Walking through Webs
* **Gloom** – Meteors
* **Darknell** – Meteors
* **Black Mage**:
  * **Phase 1** – Lightning Pillars
  * **Phase 2+** – Rolling Projectiles (before they hit the floor), White Orbs
  * **Phase 3** – White Full-Map Attack (FMA)
* **Seren** – Falling Fireballs
* **Papulatus** – Floor attack

{% hint style="warning" %}
If you dodge an attack that **deals damage proportional to Max HP**, your remaining Dark Sight duration will be **reduced by 20% of the maximum time**.
{% endhint %}

### **How Dark Sight Affects Boss Gauge Mechanics**

Certain bosses have **gauge mechanics** that build up when hit by specific attacks. While Dark Sight can **prevent damage**, it does not always prevent gauge accumulation.&#x20;

* **Seren's Dash Attack** – Hoyoung **will not take damage** if dodged with Dark Sight, but the associated **gauge will still increase**.
* **Other Bosses with Gauge Mechanics** – Some gauge mechanics **continue increasing** even if damage is negated.

### **What Dark Sight Does NOT Dodge**

While Dark Sight works on many **environmental hazards**, it does not avoid most **targeted or tracking attacks**. Some notable exceptions include:

* **Seren's Sunset Pillars** – Not avoidable with Dark Sight.
* **Direct Targeted Attacks** – If an attack is aimed **directly at you**, it **cannot be avoided** with Dark Sight.
* **Seren's Dash Attack** – Does not deal damage in Dark Sight, but still builds gauge.

### **How to Tell if an Attack is Avoidable**

A **general rule of thumb** is:

* If an attack **falls from above** or is an **environmental hazard**, it **can likely be dodged**.
* If an attack is **directly aimed at you**, it **cannot be dodged**.
* If Showdown can **disable** an attack (untouchable), it usually means **Dark Sight can avoid it**.

#### **Weird Exceptions**

* **Will’s Webs and Black Mage’s Lightning Pillars** count as “collision-type” attacks, meaning Dark Sight works even though they don’t fall.
* Some boss mechanics function uniquely, and the **best way to test** is through trial and error. If you **get punished, don't try it again**.&#x20;

***

#### **Credits**

* **@Soushi, fail, Giatore** – Discussion on Dark Sight interactions and mechanics.